summer flowers

summer flowers

Sunday, May 12, 2013

Natural Dyes

I have not done a lot of natural dyeing for several years.  About twenty years ago, I did lots.  It was fun to go out into the fields or mountains and collect plants, then come home and see what colors I got.  I got lots of gold, brown and blah beige.  I ordered some plant and insect materials and got brighter and more exciting colors.  

A couple of years ago, I took a class and did mud dyes and stenciled and stamped with natural dyes.  We were using dye extracts and got great colors.  In some cases I put more layers on the fabric than I should of and ended up with mud... but there were some fun samples, too.
Here is the scarf I did in that workshop

This spring at TPCH, the gardening instructor suggested a combined class; planning and planting a dye garden and using the plants for dyes.  I was teaching the second class with using the plants for dyes.  Unfortunately, our dye garden was torn up for new sidewalks last fall and we are just getting plants back into the new one...so I needed to collect something for the class and this is early in the year to find much.  I ended up gathering dandelion blossoms for the first bath, the wood worker gave me paduak sawdust for the second dye bath and I found a jar of Brazil Cherry sawdust that had been soaking in alcohol for a year.  (It had been left by the previous textile instructor.)  

I decided to do the dyes in a canning pot so I set up two jars of each dye bath for the student's yarn samples.

Bottles ready for yarn to be added then processed.
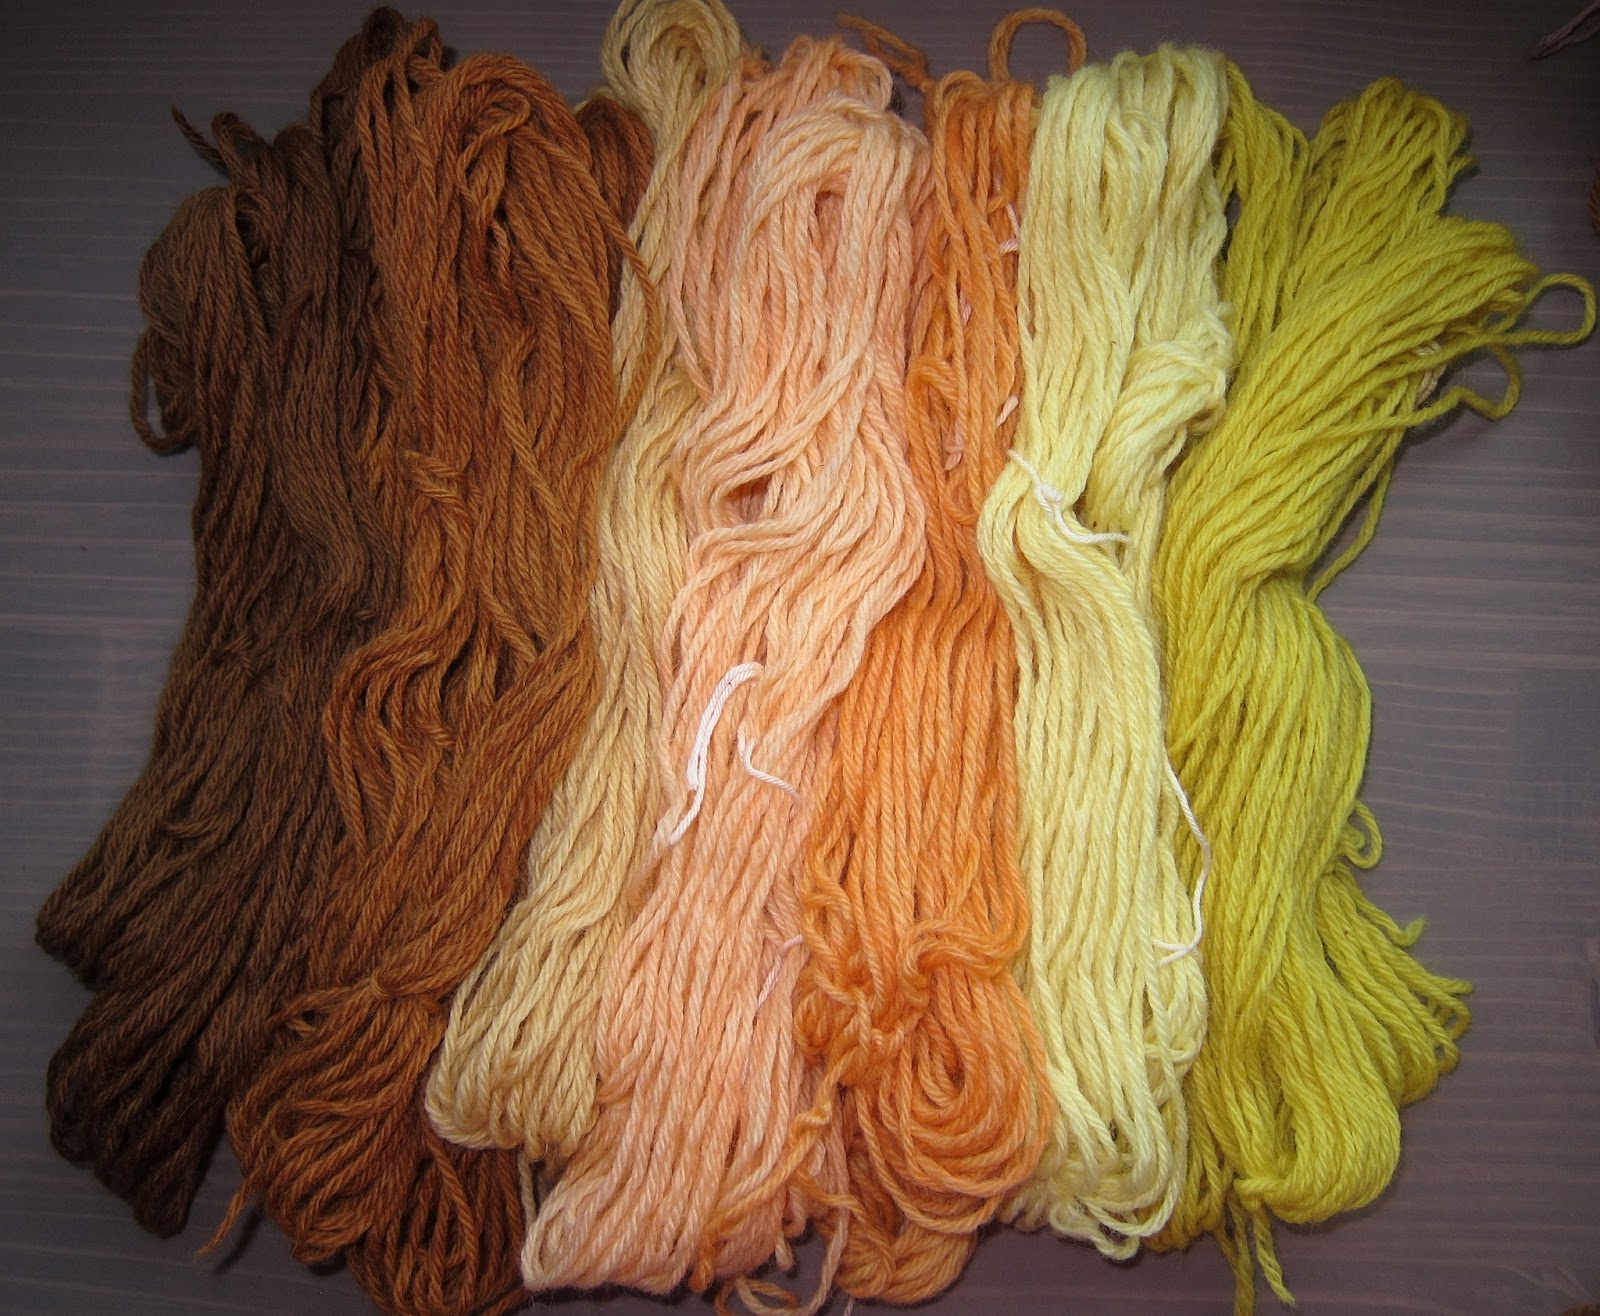
The first two bottles are from the dandelion (greener than I expected, I just steeped the blossoms), the next two are from the paduak soaked in water for 2 weeks, the fifth bottle is from paduak soaked 1 week in alcohol (I expected a red color from the paduak, so tried soaking in alcohol to get a deeper, redder color)  the last two bottles are from the cherry.

The yarns I used were some knitting weight wool yarns and they ended up looking great!
Cherry, paduak in alcohol, paduak in water, dandelion
Unfortunately,  I had not tested the hot plates that we have at the class and they did not work.  After three hours on high, I could still stick my hand in the water.  I took the dye baths home and simmered the jars for 60 minutes.  I still had some color left in the dye bath, so I added some more yarn (all of the yarn was pre-mordanted with alum).  I also had some left over dye bath that didn't fit in the original jars so I added that and got some exhaust colors.

I had a fun time in the class, the class members got some great colors and I guess I will weave a scarf or something with some great color stripes...or I could knit a hat.

Monday, April 29, 2013

Old Textiles

I have started teaching at The Pioneer Craft House in Utah.  The art institution was started in the late 40's by two weavers, Mrs. Glen Beeley and Mary M. Atwater.  Mary did not stay with it, artistic differences between the two women.  But both of them left a legacy that I hope to continue.

In order to do teaching on the equipment here, I had to clean, oil and repair each of the floor looms.  Out of the eight looms only the two Hammet looms don't have companies still making looms.  I had the instruction manual fro them, and it gave the bolt and screw sizes, so I was able to get them working.  I had to drill and replace a worn screw with a bolt on one brake and now it is holding very well.  I have gotten parts and help from Gilmore Looms, Harrisville Designs, Macomber and Leclerc.  I am working on the last loom now.  

In most cases, besides the dirt and dry wood, brake problems have been the main problem.  But a few bent treadle rods and replacement aprons have been in the mix.  It is so great to sit down to a loom that is working well and that looks good.  I have straightened the heddles (I have a ton of them for replacement.) and put on or ordered more tie-ups for the treadles, too.

Another part of the clean-up here is the old textiles.  There have been a large number that have just been tossed, old student work that even they did not want, etc.  But there have been a few treasures.  I have an old coverlet, 1800's according to Sharon Alderman, that is hand spun and dyed with indigo.  I will need to clean it this summer, Sharon gave me some help with how to do this.  It has two panels and they have been stitched crudely with heavy waxed linen, so I may remove that stitching and re-do it.  We will have to see when I get it out again and check it closely.  

 I have also found a large number of interesting examples of weave structures.  I washed and in some cases hemmed a number of pieces and made a display for the studio.


I think most of these pieces were woven in the 1940's and 1950's and they all were VERY dusty.  They must have been sitting and collecting dust since almost that time.  There is a large collection of overshot weaving.  I think that was a favorite weave for them.  I also have  fragments I may mount for class samples.


There are a couple of pieces with labels from the weaver.  I have seen her name in my reading of old "Handweaver and Craftsman" magazines and I found letters from her in the files.  Her name is Kate Van Cleve and she wove and wrote about weaving in the 1930's and 1940's.  The lace pieces that we have a great and there is a baby blanket in basket weave that is the only basket weave piece that I have see that is stable and nice.  It is woven in very find wool, so the floats create no problem in the finished piece.  (I am very concerned with making structurally sound weaving.)  Unfortunately, there are some moth holes in the piece, but it is not too bad.  I can still use it as a great example in my beginning weaving class.  Again, the dust in the piece was awful, but now that it is washed, it is great to show.
This place-mat and napkin in Huck lace is beautiful and has a different look than the Huck we see now.  I think the place-mat is a little softer than what I like for a mat, I see the weight as better for a table cloth.


The other place-mat is also a soft one, but the structure has me thinking of how I could use it.  She has woven a three thread Huck, but she theaded two threads next to each other on shaft three.  It give and interesting look and it is different from the regular four thread huck.  


Here is a close-up.  The doubled threads on shaft three make give a texture in the plain weave area and the two shots of metallic are at the top of the hem.  There is a lot of metallic threads in these old weavings.

There are also a number of Guatemalan pieces (mostly tourist stuff) and some interesting stitchery on table cloths.  I will have to get some pictures of them.

I also got my heavy weight towels hemmed.  I am very pleased with them.  I will probably put a couple in the drawer for use and them keep some out for using later.
I ended up with seven towels and a plaid table mat.  I have two towels that are the plaid, three that are white weft and one each of blue weft and gold weft.  It was a good test of the loom and now I have a new group of towels.  

Thursday, April 18, 2013

My Heavy Weight Kitchen Towels

A few years ago, a friend bought some heavy kitchen towels that were handwoven.  I realized that they were woven with 8/4 carpet warp.  This is a yarn we had a lot of in the LYS.  I decided to try weaving and using heavy towels to see if I liked using them.  I wove some towels for my sisters and myself to try, and I liked the heavy weight.  I still like finer threads for towels, but these are fun to make and use.

I wrote about some pink towels I wove for a friend a couple of years ago.  Now I have woven another set of towels.  These were warped to test out a loom I had just cleaned up and repaired at the studio and to test an AVL warping wheel.  


Here's my second "wheel" warping 
My weaving study group came to the PCH weaving studio to show me how to use the "Wheel".  One of them has one and has been working with it.  This wheel had been put together backwards and we really needed to work on it to get things going.  We wound a six yard warp (three times around the wheel) to put on the Hammett Loom that I had just finished cleaning and setting up.  (An interesting side note, I thought we were putting on 6 yards, but 3 times around a 3 yard wheel gives a nine yard warp!!)  The picture is from my second warping on the second Hammett Loom.  But now the wheel is working great, amazing how much better it works when the parts are on right and the washers and nuts are in the correct order.

My towel warp was a nice striped piece...I had over dyed some yellow 8/4 to get a gold color and added some white and blue from my stash.  
Some towels woven one color and some woven plaid
The weaving was fun, but as usual, I just started the hems with plain weave, and it probably would have been better to use basket weave.  Basket weave washes up better so the hems lay even.  

The test on the loom went well.  I found that the screw holding the brake pawl on the ratchet, indeed, needed replacement...it gave out about yard 5.  I had figured that I would need to drill a hole and replace it with a bolt, but I had hoped that it would hold until the warp was done.  I removed the pawl, drilled the back upright and put a new bolt to hold the pawl.  The loom worked great and no problem with the brake holding.  Of course, using a ratchet brake is not as easy as a tension brake, but you get used to how to "finesse" the tap on the brake release pedal.

I knew the rug class was coming too fast (they needed this loom) and the plaid pattern was taking too long to weave with all the unplying and tucking in the ends with each color change, so I did the fast thing....I wove and  just let the ends hang out to finish later.  It worked, I got the towels off the loom and students were able to warp the loom for rug samples. (For the rug class I cleaned, oiled and repaired six looms...luckily, I had the help of a couple a great students.  Now I only have one more loom to repair the brake and get it weaving.)


But that left me with lots of ends to finish once it was off the loom.
Here are the ends I needed to weave in
I have started to unply the yarn/thread and tuck only part of the ply back into the weaving.  I found this method in an old weaving article by Bertha Frey.  To do it I un-ply the weft back into the web.  I leave one ply there and use the other two plys to finish the pick and wrap around the end warp, then tuck one ply in about 1/2 inch and the other ply in about 1 inch.  Hard to explain but a great way to make the color change disappear.   With the towel off the loom, it took a little longer but still gave the same great look.
Here the gold and white are unplyed
In the picture you can see that one of the three plys is unraveled back into the woven web.  I then need to needle weave the two plys back into the web, catching the outside warp end.
Here the white is needle woven past the first ply
It takes a little more time to do this method, but I like the result better and I am willing to take the time for a piece that I will be looking at.
Here the ends are needle woven back in and trimmed
Here is the finished edge...the color changes are almost invisible.  I love the way this looks and it makes me happy every time I use the towel.

After the ends were woven back in and any errors were corrected I washed the towels a couple of times.
Fabric washed and unwashed
You can see how magical wet finishing is on fabric.  The fabric goes from warp and weft threads to fabric; the spaces close, the warps and wefts find their proper places and the fabric feel softer.  Now I can turn under the hems and stitch them up.  I am currently in a hand finishing mood, so I will hand stitch them.  But machine stitching is fine and I will do that when I am in a machine finishing mood.


My current project on Hammett II
Here is my test for the second Hammett loom.  This one was another warping wheel demonstration, but only 4 yards long.  The Pendelton "worms" and warp were purchased years ago.  I thought I purchased enough of the tan yarn for the full warp, but I must have used some of it over the past 20 years.  It's hard to see, but if you look under the beater, you can see about an inch of space left between the finished rugs on the cloth beam and the beater.  At this point, I was worried that I would not be able to finish the rugs (two of them), but I managed to squeeze  the last few inches on the rug to use all of the "worms" or selvedges that I had purchased.  The only problem now is the color...not quite the colors that I have in my house now...oh, well. 

I will probably leave the rug on the loom until something else needs to go on.  The loom looks so much better warped and weaving that bare.


Friday, March 29, 2013

End of the Month Already

I look at the stuff I wanted to do and I feel like I have not got anything done.  Do you ever feel like that?  We need to step back and look at what did get done.

I have been working on the Rug Weaving class.  I had several requests for this class, so I scheduled it for spring.  When I pulled out the information...I had not taught the full class for a very long time and all the notes, handouts and examples needed to be refurbished and updated.  I based the class on the old "Rug Weaver's Sourcebook."  This book has six different types of rugs, with the chapters written by six different weavers.  I loved this book and this class is an overview of rug weaving.
Six little rug samples
In this class we weave six different structures, use 5 different rug warps, 4 different rug wefts, and finish the samples with six different rug finishes.  It really is a nice overview of rug types and materials.   Like I tell the class, any one  of these techniques could be explored for a very long time and not repeat yourself.

This class is, of course, a "musical looms" class.  (You weave on six different looms so need to work with others to have everyone finish the six samples.)   I am teaching this at Pioneer Craft House on the floor looms in the weaving studio.  So I had to repair brakes, wash down and oil, and replace broken parts on six looms.  This was the main reason it took so many months to get ready for this class.  I've talked to some great people at several loom companies to get parts and help on my loom problems.  I am so happy that seven out of our eight floor looms are working and looking good. 
There had not been much work or TLC done on them for a number of years (maybe forty years on some) so the wood was dry, the heddles were out of order (a pet peeve of mine) and I have used a full bottle of Howard's Wax and Feed and half a can of Johnson's floor wax.  The wood is still dry and needs to have another layer of wax and oil before the summer is out...But the looms are working.

Heddles out of order
Heddles in order
The heddles are so much easier to thread when they are in order....

So now my looms at PCH are in pretty good working order, but my looms at home are sadly neglected.  There has not been much weaving going on.  One is empty and waiting for me to wind the warp, and the others sit is various states of partially done projects.  I will try to concentrate on them while I wait for brake parts on the last loom.

I have been having a good time though.  I find I smile more than I did before I stopped working at "X."  The world is a happier and more beautiful place.  I enjoy the blue skies and warm weather that we have been having...my flowers make me smile also.
Don't these golden faces give your heart a lift?
My first daffodil had a setback in the snow but is blooming today
As my son said, the snow is over now, because my daffodils got snowed on.  It seems like for years we have experienced this.  My daffodils come out and then there is a snow storm on them, and then winter is over.  Today the sky is blue the flowers are blooming and I even made it to the gym.

I have been weaving for a friend.  She has been a weaver for years, but with health problems has not been able to treadle a floor loom.  She offered me the job of throwing the shuttle for the projects that she warps.  I have had a great time helping her out and since I no longer have a full time job...this is the best job I can think of.  
She recently had a blanket to be woven.  She plans, warps, sets the beat and winds the bobbins.  I come and throw the shuttle for a few hours.  When I went to weave on the blanket I had slept badly and had a bad night, but sitting at a loom with the sound of the shuttle and beater, after two hours of that I was able to face the world for the rest of the day.
Weaving every inch!
We wanted to weave every inch to get as much length as possible on the blanket.  After taking the tension off the piece and cutting the loops, there was about 6 inches left as loom waste!  That was just enough to twist the fringe.  I can't wait to see the finished blanket...


Monday, March 4, 2013

It's warmed up a bit...so time to make felt

It's warm enough that I can get out in the garage and start to make felt.  This is wet finished felt so, lots of dripping water.  That is why I put the machine in the garage, but it is colder in there and felt takes longer if it is cold.  Now that the temperature is up above 40 degrees, I need to get some work done.

Today I have been felting some needle-felted pieces.  The customer wanted to have something that was a more stable fabric than the needle-felt is.  This felt was thicker that the other needle felt that I had worked with and it was much denser.  But it is dirty...it feels greasy...like it still has lanolin in it.  I'm not sure how it was processed to get to this point, but with the lanolin, it is taking longer to wet out.
Here's the first batt
Here is what the backside looked like after a jug of water...about a half gallon.  I had sprinkled it on and patted it to get it to work through, but when I turned it over this is my surprise   It took another half a jug to wet it.
White batts on blue bubble wrap
On the white batts, the color of the bubble wrap showed through where the felt has wetted out.  There was some unevenness in the batt, but most of what you see is where the batt is wet the blue shows through, where it is white there is a dry area.  It was just hard to get the water in the fiber and without wet fiber....I can't get good felt.
Wet floor...see why I do it in the garage!
The water was running out of the roll, and then when I unrolled the felt, I still had dry spots...like the stuff was waterproofed.  It took more time to wet out this wool than I am used to, I guess it is the lanolin.  It is a lot nicer to felt with clean wool.

The other interesting part was how the felt held together.  I tried to fill in some thin places like I usually do.  Take some wool from a thick place and put it on the thin place.  But it is not so easy with the needle felted wool.  It holds together quite well.
Test pull on the felt surface.
The white was a little softer.
Test pull on the white batt before wet finishing.
The white batt was softer, but when I tried to separate a section of the felt, it just stretched out of shape, but would not let go.  Interesting...so the fibers are felted together, but they will pull out of shape quite easily.  Good for a batt in a quilt, but not so good for making a felt item.  It would probably work well for shoe inserts...if it was clean...but not for cut and sew projects.  I am learning lots about needle felting with this project.

Needle tracks on the first batt.
Another interesting thing is the needle tracks.  On the needle felted pieces I had wet felted before, the tracks almost disappeared from the surface.  This time they remain pretty dominate.  Is this because these batts were needle felted longer?  The other batts were much softer and when I felted them they flattened and thinned.  These are so densely needle felted that they do not flatten or thin out.  I even tried the vibrating sander on the surface to see if I could get a different look, but to no avail...it still had needle tracks.  On the darker wool, there is a pin-stripe effect.  I think it will be fine in the finished items, in fact, it will add a bit of interest to the surface. I don't know if the customer will be adding a design to the surface, but it will look good with or without additional decoration.

The wet finished batts are nice.  They hold together well, these will not stretch out of shape, and they will make some great cut and sew projects.  I am pleased with the ones that I have finished.  The white ones are still on the machine, with the softer surface, I think they will show less of the needle tracks.  I'll take pictures for you tomorrow or Wednesday.

Sunday, February 24, 2013

Oh Where Has the Month Gone

So much of the month has past and I have not published.  I want to try to publish more often, but I spend my computer time reading all the other great blogs.  

The past couple of weeks, I feel like I have just been putting heddles in order.  A slow and often painful job.  I finished the work on the folding Gilmore at the Pioneer Craft House and when the students cleared the warp off the Gilmore compact, I decided to start on it.  I have a soft spot in my heart for a Gilmore compact, it was the loom I learned to weave on.  Way back when, this was the main loom type that was in the university weaving studio where I first learned to weave. I really wanted this kind of loom for my own, and when I called Gilmore to order one, he had a 48 month waiting list.  I moved to a different loom, but I still enjoy weaving on these.  You have to finesse the back brake a bit, but you get used to it.
Gilmore compact
This loom is in better shape than the folding Gilmore, but once the warp was off, I found several things that need replacement.  I was concerned about the apron bands, they did not really fit well, but they were working fine and I decided not to order any when I sent the order to Gilmore for parts.  However, when the warp came off, I could see that they were worn much more than I thought.
Gerry-rigged apron band
The back beam bands obviously need replacement, so I might as well get the front replaced also.  Then the loom will be in much better working condition.
One part I don't think I will be able to repair is the tracks for the shafts on the castle.  We have a broken piece.
See the broken piece between shafts 3 and 4?
I don't think I want to have a piece made and try to glue it in.  The loom was working fine, I asked the weavers who took the warp off, so I guess we will have to just live with that one.

My big problem was the heddles.  I like to have my heddles in order.  The "eyes" all face the same direction, and there is less chance for them to tangle.  However, on this loom they were going every which way!
Heddles all mixed up!
Here is the top on one shaft.  There are even a couple of different types of heddles...there is no way these will all line up and nest properly.  
Here's the bottom of the heddles.
If the "wavy" opening is on the top, the straight opening should be on the bottom.  You can see in the second picture that quite a number of the heddles are upside down.

I know that mixed up heddles are not a problem for everyone, but I hate them.  And anyway, when the heddles are in the right order, it is faster and easier to thread them.

So I have spent about a day on each shaft (there are eight shafts) and since I spend three days a week at the PCH studio....that is a little over two weeks to get the heddles in order.  Right now I have several groups of 50 heddles in order and on safety pins ready to put back on the shafts after I get the loom washed and waxed.  I think this will be a great loom to have ready for students to work on.  I know it is in good working order, so I will probably not put a test warp on it. 
I do need to cut some more texsolve cords for the tie-ups.  I decided to keep the texsolve on this Gilmore and I put the "old style" snitch knots on the folding Gilmore.  I like to have a variety of looms, and methods in a teaching studio.

My weaving has been going slow, but I have been making progress.  I put the pillows on the Baby Wolf and have finished one and a half pillows, which is good--that is half way done.  But I needed to take one of the ski shuttles downstairs to the Big Mac. 


 I have put on a warp for 2 rugs that need to be finished next week.  
Half way through threading.
In the picture, you can see the next six heddles waiting to be threaded.  I like to weave these rugs in the in a six thread, four shaft pattern from Meany's Rag Rug Book.  I figured that I could thread a straight draw on six shafts and if I do a straight draft on 12 shafts, I can do several different patterns on one warp.  This works well because I usually put on about 20 yards when I thread this loom for rugs.  I can treadle the "chicken foot" pattern, or rosepath, or twill, or plain weave, or whatever I want.

I would like to get the rugs off this loom and then put on the yardage that I tested with the hand-spun. 
Do you remember this yardage from way back?

 I received the yarn, and I want to get it on, but since I will be threading full width with 24 or so ends per inch, I will probably need to put some extra heddles on this loom so that I will have enough.  But that is next weeks problem, for now I need to get back to the loom and weave those rugs off.

Tuesday, February 12, 2013

New Year Update

It has been an interesting couple of weeks.

First the weather, we had lots of snow and very cold temperatures.  I know there have been  worse weather in some places, especially in the Northeast, but I have not enjoyed the cold and I am tired of the snow.
Poor bushes---will they make it?
 I really worry about the bushes that got the sever trimming (butcher job?).  These are broad leaf evergreens, I think they are marginal in this climate and with their hatchet job this fall, they may face a tough recovery in the next year.  

Then the electronics...I have been without a keyboard for about a week.  The old one had several keys with no letters (worn right off!), and was not working as well.  DH found a clean keyboard in the garage and hooked it up.  It was so old the driver messed up the computer and then no keyboard would work.  DS suggested (strongly) we just buy a new one and he would come to put it in.  After a backup on the computer, we now have a keyboard working, there are not crumbs in it and I am getting used to the action...a few miss-keyed words.
But the big embarrassment today was my phone.  Yes, I finally got a smart phone.  Unfortunately, it seems smarter than me.  It took me a couple of days to get it turned on...and today I could not get it turned off!!  I charged it last night and had it sitting on the loom.  Someone called and the phone rang, but the screen froze and I could not answer it.  And it just kept ringing....for 20 minutes...I finally called the service provider and got some help...
"Did you try to turn it off?"   "You have to hold the off button down for several seconds!!"

Why didn't the information that came with the phone say this...did I just not read it?...or was I not smart enough to understand it??!!

On to more interesting things... weaving.  
After several restarts, I have all the looms working.  I bounce from loom to loom weaving and not getting anything much done anywhere!...

On the Dorothy table loom, I put it away for a while so I can get fabric to weave some panels for a bag.  I have been checking my sewing books and I have almost decided on the style and size.  At least the idea and project is proceeding. 
On a side note, I bought an eight shaft Dorothy table loom, so I can combine them to make a 12 shaft loom.  Yes, it was interesting explaining what was in that big box ("You need ANOTHER loom?") to my (long suffering) DH.

On my Baby Wolf, I have the pillows weaving well.  This weft is the core-spun yarn and I decided to weave the front and the back of the pillows.
Here it is again on the big loom
Yes, after I put it on the Big Mac, I realized that it was designed for the Baby Wolf and the warp on the Baby Wolf was 10 shaft and needed to be on the Big Mac.  I guess I was in such a hurry to get the warps on I switched them in my mind and put them on the wrong looms.  Luckily, I had not cut anything and was able to switch them back.  
Here is the weaving proceeding well.
Here is #1 in a point twill.
I like the way the color changes on this weft.  I think the rust, browns and blue with look good with the living room rug.

And the other "moved" warp...
Here is the warp on the Baby Wolf.
When I sat down to thread the shawl, I realized that it was on an eight shaft loom and  is a ten shaft pattern.   I was pretty upset with myself.  I need to remember not to hurry through projects...and maybe I should concentrate on one warp at a time!  
Handspun Crosses
I do like the way the pattern is working.  The half the crosses show up on the top and then half are on the underside.  It makes a nice reversible fabric, perfect for a shawl.  I hope the color change in the handspun yarn shows up well over the full piece.  It mostly looks green here.

The yarn for this fabric was a problem.  When I first pulled it out to warp, I realized that it was so over plyed that it looked like little springs.  First think I thought..."Was I drunk when I spun this?"  It turns out that I may have been!!!  The roving was a prize at a spinners retreat (it was not my usual color purchase) and I know that wine can flow freely at that event!
I found this picture of the original yarn

I had decided to tone down the orange and darken the greens.  But after the dye job, it looked and felt like corkscrews, so I ran it through my spinning wheel to "unply" it slightly.  Because the weave structure contains the yarn well (no big floats), I figured that it would be fine.   And I am pleased with the color of the shawl.  I like to rust ground and the greens are not too bright..  I think that I did the "chain ply" or Navajo ply to keep the colors pure in the finished yarn and the technique is easy to over-ply.  

The fabric is weaving slowly, but I am enjoying it.  I started using an end feed shuttle for the ground fabric, but I switched over to a regular boat shuttle and I am getting better selvedges.  I think the wool yarn "hung up" more in the end feed shuttle.


The last thing that I have been spending time on, is getting some new cabinets in my house.  I have been wanting to replace the hutch that I pulled out of my dining area some years ago.  I finally found something that will work.
New Hutch with some of the dishes put in.
I needed to pull everything out of the pantry to find the boxes of dishes that I had put away when I got rid of the old hutch.  I washed the dishes and have started putting things away.  I still have some empty shelves and drawers as I rearrange my kitchen.  I like the shelves, they do not take up too much space by the table and I have access to my old dishes again.  I also put some favorite cookbooks on one shelf (I removed the cabinet in the living room where the cookbooks and sound system were).  I brought out the mugs and wine glasses that my DH and I collected in the first few years of our marriage...fun to look at some of the old things.  I also got rid of some of the items that I had stored away...don't need them now and they didn't have any sentimental value.

I also put new shelves in the livingroom.
New table in front of the window.
When we got the windows replaced, we lost a couple inches of window sill.  Unfortunately, that is where our cat loved watching the world go by.  She is so old now that jumping up in the window is hazardous, so I put a table there for her to sit on.  I may need to pull the stack of books out of the bottom shelf and put them on the floor next to the table to give her a step up!

Here is the replacement shelves in the living room.
I also put in some shelves to replace the old hutch bottom  that was holding the sound system in the living room.  The middle section needs a glass front unit to hold the system, but I have not found the perfect one yet.  I love having the floor open, before the hutch was mostly enclosed on the bottom and was hard to clean under.  I think this will work better.  
I did have one accident when putting these up.  I wanted a felt pad under the speakers on each side, and cut one out with the rotary cutter.  The felt was so thick (it was some that I had made trying for a saddle blanket), and I sliced off a thin layer of my index finger.  I hate it when I don't pay attention.  Maybe I do need the protection gloves that you can get when you use that tool!!