summer flowers

summer flowers

Saturday, October 27, 2012

New Project Started

I have still been finishing old UFO's.  I'm pleased to get some things done, but when I clean areas of the studio, I am finding more yarn that I bought for projects and it is just stacking up.  

My son moved out and is clearing out his bedroom, and unfortunately I am moving boxes in there to get the studio cleared and cleaned.  We made a deal, he will continue to take his stuff out if I will continue to get mine put away also.  (We want to get the room cleared up and put in a desk, sofa bed and make a nice extra room to relax in and give my DH a space for his computer that is comfortable.  I do plan to move my Baby Macomber down into that room...we have to have a loom in every room!)

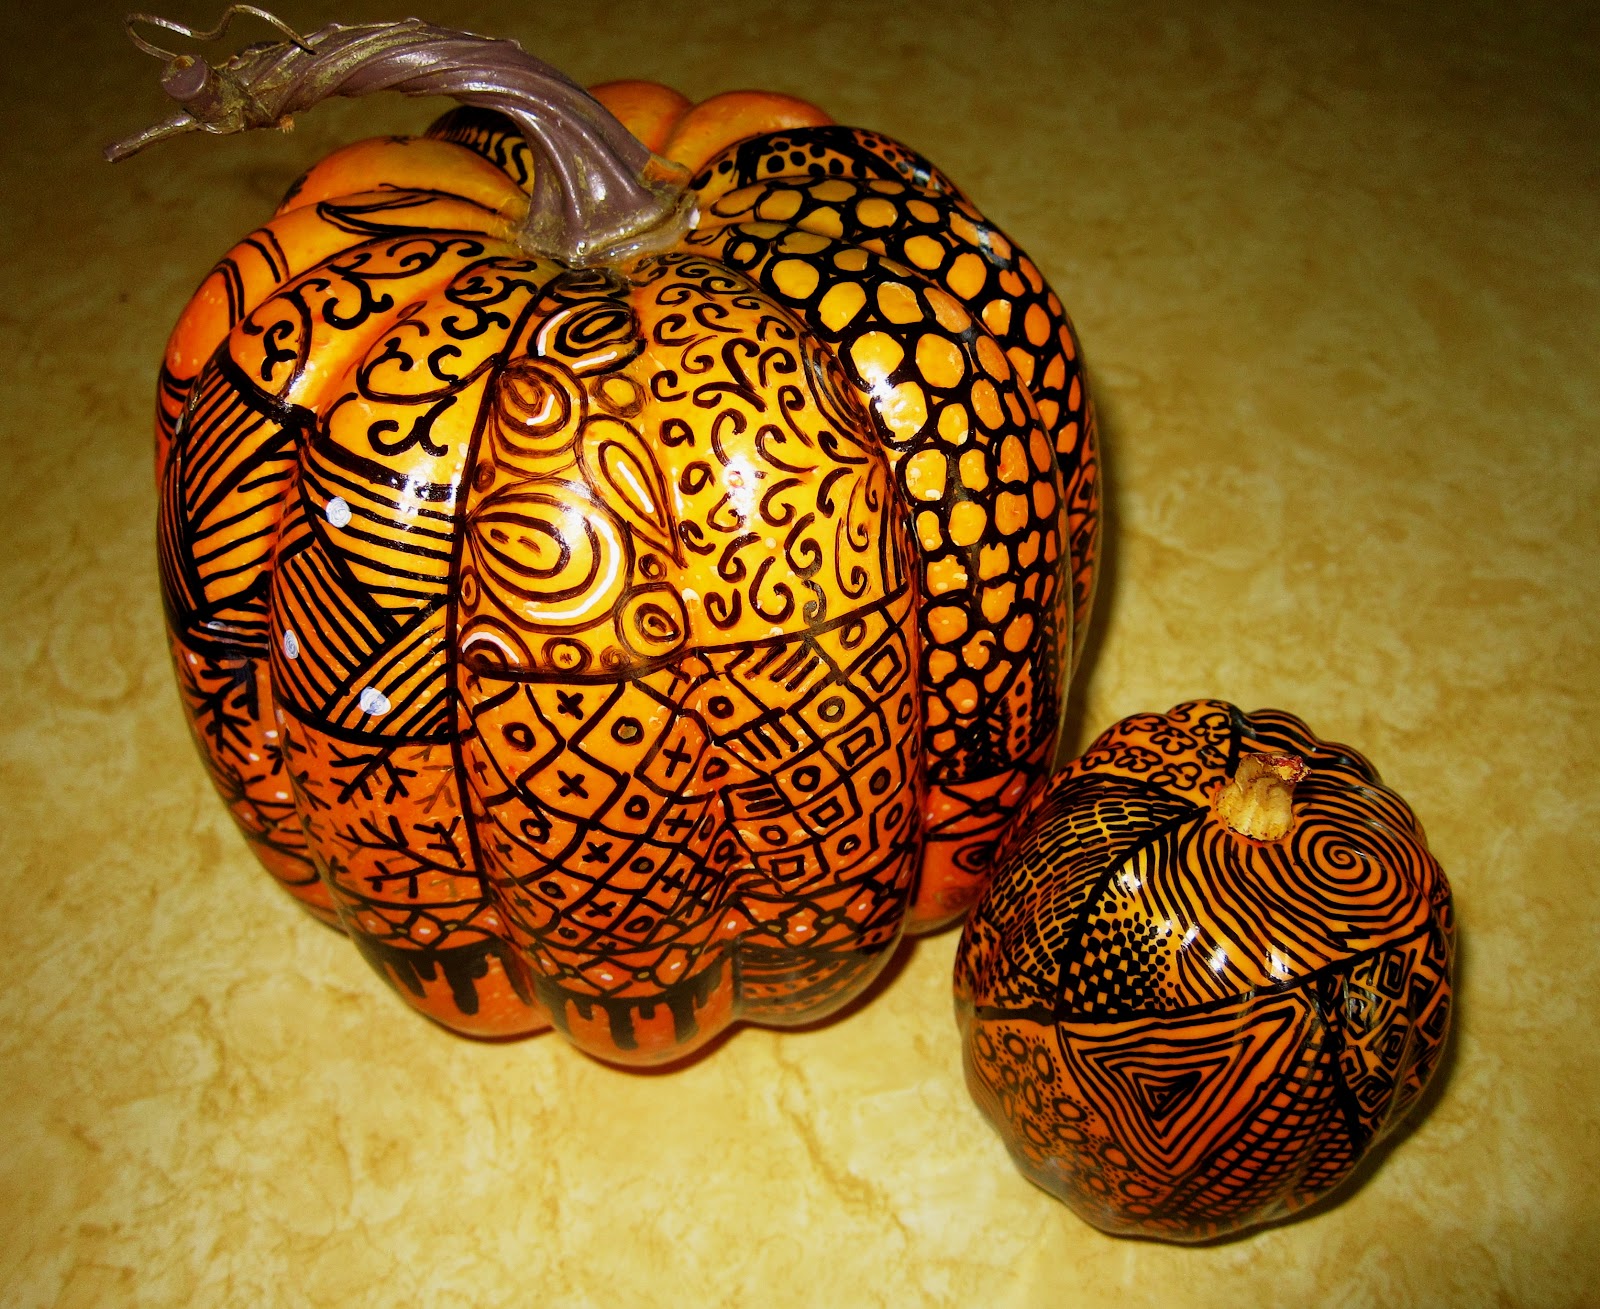
I have to show you the pumpkins that my DD and I did in a class.  I saw the sample from another teacher at Pioneer Craft House and had to set up a class with her.
Our new Halloween Decorations
The pumpkins are zentangle drawing on the fake pumpkins that they sell everywhere.  You need a Sharpie oil pen and then you just get going.  The small one is my DD and she made very dense patterns.  Mine is the larger pumpkin and I divided the spaces up and just started going. Today I was adding some more lines, a few white dots and patterns and putting some gold bits on.  Like my friend said, I will just keep adding stuff to it until I ruin it...  I think they will look great with my grinning pumpkin man from the sister date.  I wish I had the soot sprites, they would look great with it, but they went to my sons house.  I still have several eyes and a ton of yarn so I could knit up some more.

My new weaving project is towels for my sister's big birthday.  She turned 50 while we were in Europe together, but we are having the birthday luncheon next month, finally.  I had her pick out some colors and I have been thinking of the pattern I want to use for about a year.

Last time at Intermountain Weaver's Conference,  I took a class from Robyn Spady.  She introduced us to a wide group of weave structures.  These were unusual, most I had seen and read about, but this class give me a chance to weave and try them out...including velvet!
If you have a chance, take a class from her.  She is a great teacher and loves to share what she knows.  I learned a lot in the class, and after 30 years of weaving, I very seldom can say that after a class.

The first structure that I wanted to try from this class is her "Better that basket weave".  This weaving looks like basket weave, but has tie-downs to make it a structurally sound fabric.  

I know Sharon Alderman worked out a version of this structure in her book "Mastering Weave Structures", so that is another place to look up how to weave it.

Doesn't this look great...8/2 cotton
I love the look of the pattern, sorry I was bad and did not wash the sample.  In the two color areas, you can see the tie-downs.  In Robyn's towels, these were less visible...she had washed her towels, of course!

Yes, I am copying Robyn.  She made her towels in three large blocks of color, and I will be doing the same.  The sample shows the way the blocks are set up.
I loved the look and of course the pattern is the same on the other side.  Robyn suggests setting the yarns closer that with plain weave, for the 8/2 cotton she suggested 24 epi.

Her towels were great and I decided that a light, a medium and a dark value would be great for my sister's towel also.  But when I presented my sister with the available colors from UKI, she picked out middle value for two of the colors.  Oh well, they are to match her new kitchen after all!  (I decided on the UKI, because they had a sale on the available colors.)  I went through the color card and along with my sister's colors, I picked out some for me to have on hand for further weaving.

Nile Green on the bottom, 2 strands of the yellow green I ordered.
It's never easy is it?  The green that she wanted was out, so I ordered another light green and I planned to  over-dye the yarn to get a good color.  

After thinking about the dye problem (I had just over-dyed two and a half pounds of yarn for another project where the available color did not work), I decided to try the net.  I asked all the lists that I am on if anyone had that green that I could buy.  I received a number of suggestions, but not yarn.  I decided to contact other yarn stores, as per suggestion, to see if they had any on hand and found some!  I ordered the yarn (it was more expensive, but less work than the dye job) and I got notice from another weaver who had checked the stash and found some.  Many thanks to the weaver, but mine was in the mail!

So now I have the three colors.  I decided on a darker neutral in the center of the towel, so all the colors are closer in value. 

Tonight I'm going to the Witches Halloween party with Mom and my sisters and next week my family has reservations to see "The Wave" in southern Utah.  So I hope to have the towels on the loom next weekend and get going on them.  The birthday party is next month, so I don't have much time. 

Friday, October 5, 2012

New Shawls and a Scarf from the Thrums


I was asked to design a shawl using an alpaca yarn.  I have had the skeins of yarn for a few months.  I had planned on weaving it in the design that I had used for some wool shawls some years ago.  I went through the old weaving notes and found the draft.  I was surprised to see that I designed this shawl in the 80's.  It is a loosely woven Bronson Lace and I really like to play with the design.  Since the Bronson is a block weave, I can vary the design by weaving lace in different blocks on each shawl.  I ended up putting enough warp for two shawls for this test run.


Blue sample from my original pattern test and alpaca yarn above it.
I remember when I wove the sample.  It was loosely woven and I was sure when I put it in the wash to full, that it would dissolve like cheesecloth.  I was so pleased when the washing set the structure and opened the lace.


Notice that there are no more heddles on shaft one and more yarn to thread
Atwater-Bronson Lace is threaded with every other thread on shaft one, so you need to count your heddles before you start threading.  I though I had counted right...but not so.  There was no real problem because I had left the extra 5 heddles on the right side before I started threading (I thought there would be five extra heddles on the left side too).  Heddles are easy to move on the first shaft, I put a safety pin on the upper loop and the bottom loop, slip them off the right side, then put them on the left side and take off the pins.  I was able to finish the threading easily.  The weaving went well too. 

Plain weave on a Bronson threading is lifting shaft one against lifting everything else and sometimes shaft one will lift with the "everything else" treadle.  With this loose of sett (6 epi) I did not have trouble with shaft one lifting so there was no need for extra rubber bands added to shaft one.

Shawl two in the weaving, loose sett and squares of lace
  I keep the tape measure pinned to the shawl as I weave.  (I pre-punch holes in the tape so that the pins don't have to punch through each time...I really miss the old fabric tape measures.)  

The first shawl had a pattern of diamonds on it and the second is stripes and squares.  I worked with graph paper for a while to get the patterns that would work on this threading and those two were my favorite.  
Shawl two with stripes and squares.

Shawl one with diamonds


I had a couple of yards of warp left, not enough for another shawl and too much for a sample, so I just cut off the shawls and fulled them.  Shawl one was fulled in the wash machine, agitating for 4 minutes.  Shawl two was fulled on the rolling felting machine for 10 minutes on each side.  I was curious to see if it would felt/full up as nice on the machine.  I was surprised that it felt softer and the fringe finished nicer.  I may try the roller more often to full my work.

Here you see the comparison of unfulled on the left and fulled on the right.
Because I put the warp on back to front, the 2 yards remaining were uncut at the warp beam rod, and were 4 yards long.  This is long enough to make a scarf, so I decided to weave a scarf in the same structure, but with a sett of 8 epi to compare the finished hand of the fabric.

Here you see the slip knot 
I put several slip knots on each group of threads as I pulled them off the loom to keep them in order.  I threaded the loom from front to back in a smaller version of the Bronson Lace blocks.
After threading, groups look bad, but have the slip knots.
I kept the warp as tidy as possible, and all the groups are held in place with the slip knots, but it does have the look of "spaghetti" in the picture.  Once the threads are tied to the back, and have something to pull against, I know that they will straighten out just fine.

And I tied an overhand knot in each inch of warp threads.  To attach the knotted groups of warp ends, I borrowed some heddles from my inkle loom and looped them on the warp beam rod.  

Putting the knotted warp through the loops.
Here's the loop heddles, used to "lash" on the warp.
I really like the loops to attach the warp when I go from front to back.  In this case, they are a little long, they could easily be half the size, but I just grabbed some from the inkle loom.  I need to make a few especially for this loom.

The warp wound on perfectly and I'm ready to tie on.
As I suspected, once I tied one end of the warp, I was able to get it straightened and it wound on easily.  I will be weaving off the scarf this week and I am deciding if I want to try fulling it on the roller felting machine (she is named "Proud Mary" by the way..."she just keeps rolling along").  When using the machine, the end on the outside of the roll fulls more, so you need to re-roll the project to full the other end.  It may be over-kill to use Proud Mary for just one scarf, but she could really speed up the fulling for a group of scarves!

Another view of shawl one tied like a scarf.

Wednesday, September 19, 2012

Spiral Jetty

Last Sunday we drove up to the Spiral Jetty.  It is about a 3 hour drive from my house and the last 20 miles are on dirt roads.  The "Earth Art" piece was done in the 1970's by Robert Smithson and it was the last piece he did before he died, I think.  When I have looked at national and some international art books, this piece is the only thing that gets Utah into the book.
This is a view from the "parking lot".

A few years after it was built, the lake level rose and it was under water for about 3 decades!   When is was visible again, we tried to drive up to see it.  There were no signs and we went down badly maintained dirt road and kept coming to gates with "No Trespassing" signs.  It was not until the second drive up that we finally got to it.  It was still bad roads and slow driving on them.  

Since the jetty had been under a very salty lake for years, all the rocks were covered with about 1" of salt crystal.  It was amazing to see, a crystalline white spiral coming out of a lavender lake.  Yes, the water looked lavender...it was like being on a different planet.  When we came home it took me several weeks and many calls to find out why the water was so pink (the lavender was from the blue sky reflecting in the pink water.)  The lake is even more salty in the north end and the algae that grow there periodically "bloom" and give the water a pink color.  In the drying ponds where the salt level is higher, it is a red colored water!

Unfortunately,  this trip the pink color was just barely there.  With all the internet checking we did, there was not a sure time to see the bloom.  But the dirt road is much improved, there are signs to help you get there and although the place is posted for no trespassing, we did not come to any gates.  We had a great time walking around the spiral, taking pictures of the rocks and water and looking at the jetty.

Here my son is getting a picture.
I look for color combinations that I can use for weaving.
Here you can see a pinkish color in the water
Shades of gray in the shore rocks..
The rock used for the jetty and all along the shore is black basalt.  Along the shore, where the water has receded, there are gray and white rocks from the salt coating.  It makes another area of colors to use in my projects.

When we were walking back to the car,  my son took off into the lake.  I think he wanted to see how far he could go until it got too deep.  It was quite shallow and he found a place that had a rock near the surface.  In the picture he looks like he is practicing walking on water...
My son walking on water
In the picture he is several hundred feet from shore, straight out from where the spiral makes it's first curve.  It was interesting to see him "floating" out there in the water.  My camera is not that clear and I needed to zoom out all the way to see him.


I have been making felt yardage, and not doing much weaving.  The current project on the loom is a test for a shawl in Bronson Lace.
The lace should open up when the piece is washed.  But at this point, I am always worried that the fabric will disintegrate when I put it is water.

Tuesday, August 28, 2012

Little bit of This and a Little bit of That

I have been working on felt.  I think I have the basics going well, and just need to continue making it.  I love the feel of the yardage for jackets.  I wish I could take the time to sew some.


Here you can see the felt machine rolling away...but I got a little too much soap in the mix, too many suds.  It causes the machine to slip, the fibers inside to slip and more mess to clean up.  The next batch had too little soap and took longer to absorb into the fibers.  (I need just the right amount to break the surface tension and not soap up the garage.)  


This is how the batts come to me.  They are folded and separated with tissue paper.  I lay them out in even layers, I like to have two layers with the grain of the batts going perpendicular to each other for the fabric strength.


Here the batts are laid out about 45" wide and 4 yards long.  The is the longest I can lay them out, because I can only fit 4 tables in the garage!  The wool looks a little fuzzy, because it is covered with a sheet of netting so that I can wet down the wool and get it ready to roll up and put on the roller machine. 
This piece of felt (100% wool) worked out great and I sold it to be made into jackets.  I hope to have pictures of jackets sometime in the future.
Right now I have seven pieces of felt hanging around in the back yard to dry out completely and then measured, weighted and packed to mail out to the new owners.  There is a combination of heavy felt and light weight felt for jackets.  


Here are some slippers that I made out of the heavy weight felt.  I needle felted a pattern on the outside pieces then sewed the slippers together.  The pattern is free from Martha Stewart.  I though they would fit me (the smallest feet in the house) but I had to get my son to model them (the biggest feet in the house).  I will have to make another pair for me.  I have not decided what to do on the bottoms to make them non-skid.  I have seen several possibilities, but have not made a decision yet.  Do you have any suggestions?


I also tried some cobweb scarves.  Here they are on the felting mat.  The one on the left is wool and mohair on a silk scarf (It didn't work at all, there was no "bearding" through the silk).  The other two worked well.
First Scarf
This is actually the first scarf (before the ones above).  I just opened the roving and let it felt.  I didn't like the clumps of wool, maybe I should have spent more time getting the roving laid out better.

Here is the center scarf on the felting mat.  The fiber is a mix of merino wool and silk.  I love the way the silk ripples when it is felted.  This one was much more successful to me.  I spent more time laying it out and got a more uniform fabric.


And here is the other cobweb scarf for the three on the mat.  This one is wool and tencel.  The tencel does the same ripple thing the silk does.  I love the look of it.  Even though I like silk better than tencel, the tencel gives a shine that is hard to beat.

Thursday, August 2, 2012

My Hand-spun Yardage

I have not been doing what I want to do.  I am not even sure where the time has gone and what I have been doing.  I did not get any more of the Europe pictures done, because I have been working through "lightroom" to be able to do my pictures better...maybe.


I did finally get a warp on and do some thinking and weaving.  I had spun some pencil roving that was very bright colored.  I thought I could use it as a surface interest yarn, with a ground fabric woven at the same time.  I had done this with Summer & Winter threading in my class and I was sure that this would work for the jacket.


Here's the hand-spun, the Zephyr (silk/wool) for the ground cloth and the book I read about the structure.  These old Shuttlecraft bulletins are great sources for weaving information.  There are no great color pictures, just "meaty" information.  


Most of the drafts used both yarns in warp and weft, and I don't think this singles will stand up to that.  The last section has patterns with the novelty yarn just in the weft.  I threaded a one block S&W and wove it up expecting to test the sett of the ground warp.


I tried both of the variations, the singles method is on the top and the pairs is on the bottom.  There were so many disappointments with this sample.  The first is just the look, I hate the stripey look...but that should disappear when I weave the 40" width (this is only 6" wide).  The structure used too much of the hand-spun, I don't think I have enough to do a jacket (maybe the front and back, but not the sleeves).  The Zephyr (which is not an inexpensive yarn) does not show at all.  That is not good use of my money.  The fabric had the hand I wanted, and it would hold a structured jacket nicely.  I wanted a collarless jacket, like a "Channel" jacket but with a "V" neck.  I had even thought of making a nice braid to bind the edges with.  I had seen a jacket like that in a catalog and was excited to make me one.  But too many things did not work in this sample.


I gave up on that threading and went back to the book.  The threading under this one did not have an illustration next to it, but referred to the front of the book.  I liked the look and re-threaded the loom.  I used a straight 6 shaft threading and changed the tie-up.  It was threaded odd; 1,2,3,4,3,4.  I can thread faster on a straight draw.  The new threading gave a great piece.


The new sample still has the stripey problem, but I looked past that and found a softer fabric that could be used for a less structured jacket and a secondary fabric that could be used for the skirt.


New Structure
Now the novelty yarn is opened up.  There are 2 shots of ground between the pairs of pattern and 5 shots between the each pair, this way the yarn will go further.  I like the openness of the pattern, and now the expensive Zephyr shows off it's wonderful sheen.  I like the color of the ground, I think it looks good with the hand-spun, and now it is tied down every 6th end instead of every 4th so it "blooms" more.


I even like the structure without the hand-spun.


Without the Hand-spun, the fabric has a nice texture
I think I could use this fabric for a skirt.  After a couple of days of messing with yarn, I have a fabric that I am ready to weave.


Well, almost...  I figured I need a second cone of Zephyr to make both jacket and skirt fabric.  I called my order in and the color is back-ordered.  I guess this one will go in the queue for later.


I have a shawl that I need to get a design for, 8 shaft huck lace.  I guess I'll move on to that for now.  I have the yarn and a request from the spinner...yes it is time for it.  What could go wrong???


Monday, July 9, 2012

Traveling in Europe

Grand Canal in Venice at night
In June, I spent two and a half weeks in Europe with a tour group.  This was the first time that I have been there...  I traveled with my husband, my three sisters and a brother-in-law.  We had a wonderful time and visited five countries.  I will be posting pictures from that trip in the next month as I finish cropping and fixing them.


My DH looking out the balcony where we stayed in Lido.
We flew into Venice and stayed on the island of Lido.  We rode boats to Venice and to Burano.  I loved visiting and seeing such a wonderful place.  I loved the boats, the buildings, the lace and the people.
Bridge of Tears (or Sighs) in Venice


It is wonderful to see a place so different from what I am used to.  The moisture in the air felt different.  Remember I am living in a desert and am used to very dry conditions. 


 I loved seeing the women making lace in Burano...they do needle lace which is different than my bobbin lace, but there was also bobbin lace shown and being done.  The needle lace that I have done was very small and an Irish method instead of the very fine and beautiful work that I saw being done.

I also liked the face that here they drove boats instead of cars.  There were police boats, ambulance boats, junky truck looking boats and souped up teen age boats.   I even saw a boat with a couple of teen age boys that had furry dice hanging from the windshield...just like teenage boys in cars!


Canals of Venice


Wednesday, May 23, 2012

What have I been doing?

I feel like I have been stuck in glue.  I know that I have been doing something, but I don't see any progress anywhere.  I thought I was going to get the stairs and hallway painted, but I only got them primed.  The same with the bathroom walls, but only one wall is primed and the others still need to have the sanding done where we filled the holes.  (The holes were caused where I scraped the old wallpaper off.)  There were a lot a bad words said when I was taking off that wallpaper.


I know that I have been weaving.  I got the December towels done, as you can see on the mast head, and I finished two orders of rugs.  (One warp 17 yards long and the other 6 yards long.)


Three 3'x5' rugs and 4 2'x3' rugs
This group had some dyed yarns and I had lots of fun seeing the colors coming up.  The last two rugs on the right are my Katniss pair.  (Coal Dust and Coal Dust Burning-I was listening to the Hunger Games as I was weaving.  Not sure if I liked the books or not.)


Coal Dust Burning


Coal Dust
These two make a good set.


The second commission was all natural colored yarns and also made a great grouping.
Three 3' x 5', one 2'x3', one 2' x 4'
The white rug is a little longer and I would love to have it next to my bed.  Stepping out of bed onto that soft rug would feel like stepping on a cloud, and in this case it looks like a cloud.


I also took a weekend trip with my family into the desert.  My DD wanted to go to slot canyons, and back to Lower Calf Creek Falls.  We had not been into that area for a long time and we got to visit some places that we had not been before.
My DD in front of the falls
Lower Calf Creek falls is about a three mile hike, mostly level so we enjoyed the walk.  Along the way we saw petroglyphs, ancient food storage areas high up in the cliffs and this bit of humor that someone had added.


I think the cut-off tree had grown there and been trimmed to open the trail, but the "teeth" really added to the look of it.


We also hiked up slot canyons in the Escalante/Staircase National Monument and those were new to us.  We all want to go back and visit other places in that area.  
My DS going up the slot canyon.
Coming out of the slot canyon


As usual I took lots of pictures of flowers and in the spring there is a lot to see.
Cactus in bloom
Globe Mallow just like we planted in the xeriscape 
Beautiful purple flowers I haven't identified


I guess I have been busy, it is good to just look at what I have done instead of looking at what did not get done.  I just need to continue to progress and work on that "to do" list.