summer flowers

summer flowers

Wednesday, December 28, 2011

Teaching and Warping

A friend of mine was not able to take a private lesson last week, and I was able to fill in.  The student was interested in getting back into weaving and improving her warping.  So in our class, she warped my Baby Mac three times in three days.  She also wound on a 6 yard hairy linen/cotton slub yarn on my Big Mac and I warped a towel warp on the Baby Wolf to use for weaving and tension correction helps.

I wove the first warp that night after she left for the day.  It was a short warp for a runner.  (She was not interested in getting a project out of the lessons, she just wanted to improve her process.)   I wove a table mat to go in the kitchen.


Table mat woven but not washed.              

Third warp for a one strip bag.

The second warp was narrow and long.  I just took it off the loom after the lesson was over, there wasn't time to weave it.  I will put it back on later to weave.  The third warp was also narrow and long.  I want to try to make the one strip bag from donisdelis.blogspot.com.  She has a great little bag that she folds so that there is no cutting.  I have been interested in that bag for a while but I did not have a strip of weaving to try it.  These pieces may be a little stiff because I was using 3/2 pearl cotton for these warps.  We will have to see what happens.


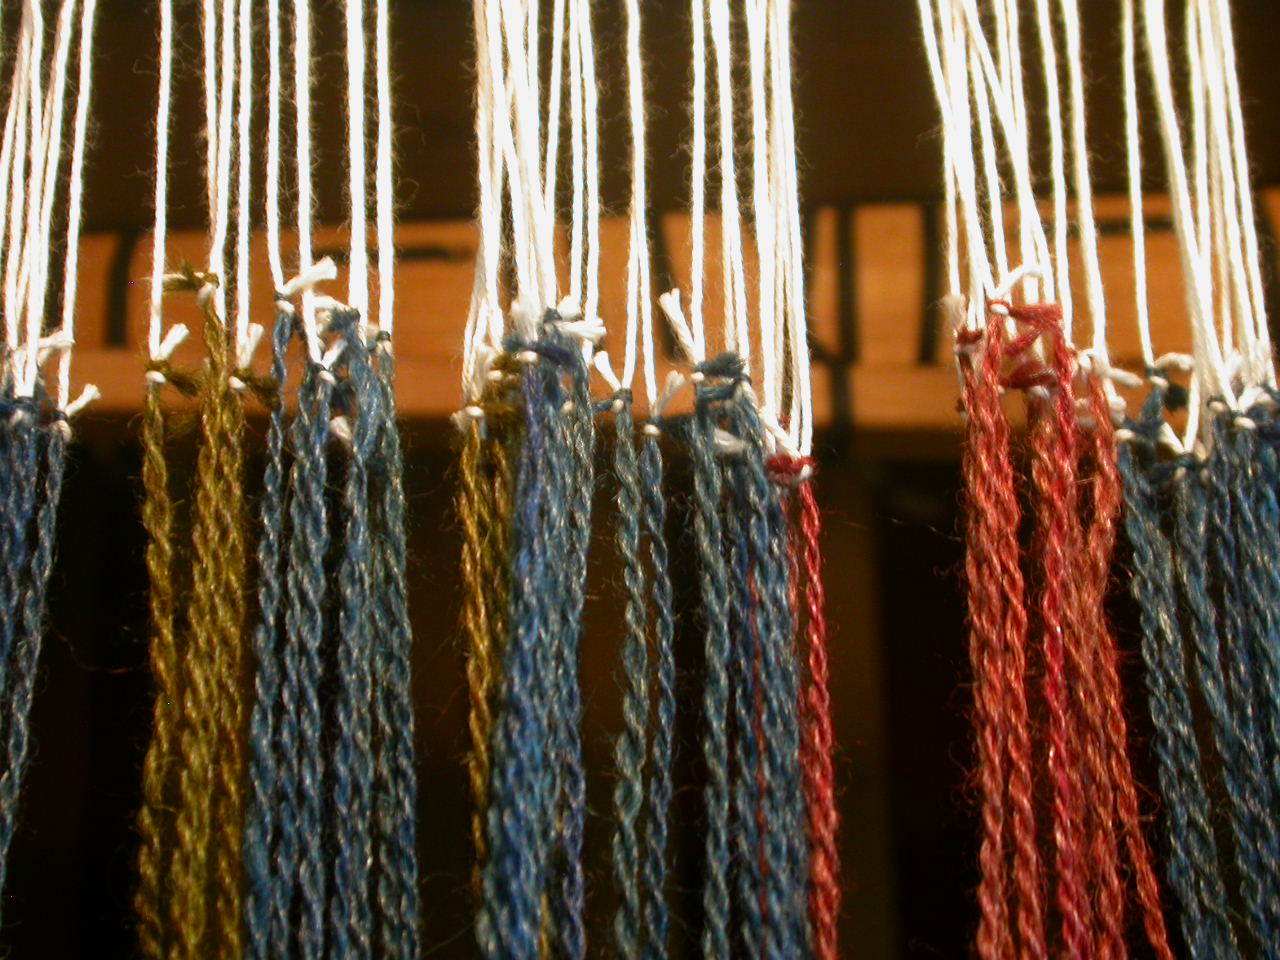
The warp on my Baby Wolf is a UFO, one of the "100 projects to finish"!  I am thrilled to get it on a loom to weave.  It is a fairly easy weave.  The worse part is the single shot of boucle that I have to weave every 20 or 24 shots.  You can see the shredded and tucked in ends on the left in the picture.  I usually trim 3 or 4 at a time.  After I weave the towels on this warp, I am going to tie on a green warp and do the companion towel.


This pattern is from an old Finnish weaving book that I have.  The lace blocks were only about a half inch in the book, because the structure is for a summer dress fabric.  I enlarged both the size of the blocks and the size of the yarn.  The structure ends up being a 3 thread huck lace.


The last warp is on the Big Mac, and is another UFO and "100 projects".  It is another towel.  This towel is just plain weave with stripes of painted warp.  I painted yarn for the stripes about 3 years (or more) ago...
Winding on the warp with a raddle.


Weaving the towels.

Repairing a knot in the warp.

I noticed a knot in the painted warp, and I always paint a couple of extra warps for repairs.  I pinned in the extra warp about an inch and a half before the knot and wove until it was about an inch and a half past the knot.  I put a small safety pin in the selvedge to mark the knot so that I can cut it out when the towels are off the loom.  This way, you will hardly be able to see the repair and I will not have a knot in the weaving.

Tonight when I walked upstairs and looked out the window I saw a beautiful sunset. 

Nice way to end the day.


Monday, December 12, 2011

Emptied a Couple of Looms

I have been getting a lot of weaving done, but only on a couple of the looms.  Unfortunately, the Dorothy and the Baby Mac are still waiting.  I need to work on them this week to clear out some space for the holidays.

On the Baby Wolf, the dummy warp held up well and I managed to get 12 warps tied on and woven off.  I did two scarves on each warp. Because I had small amounts of each color, I needed to put on many small warps instead of one long one.  But that way I got a lot of different colored and designed scarves.   It was fun to design to fit the colors and yarns that I had.  One series was in natural alpaca colors and I wove about 12 scarves.


This picture shows a nice selection of the natural colored scarves.  I wove a short length, for under a coat,  and a longer length, to tie fancier knots.

The colored scarves also came in two lengths (I call them men's (short) and women's (long).  Although anyone can wear them,  I guess I call the short one men's because that is the way my husband likes to wear his scarves and I like to loop mine around a couple of times so I need a longer scarf. 

The Baby Wolf is now empty, but I want to put a Christmas towel on this week.  I don't plan on finishing it for Christmas, but I just want to weave one of the projects that have been sitting around for years waiting for me.

I wove off the shawl for me on the Bag Mac, but I have not gotten around to twisting the fringe or anything.  I just wove it off, folded it into a bag  and put on 20 yards of rug warp to weave rugs. 

I had not put on a "sectional" warp for a long time.  In fact, I'm sure this is the first one that I have put on this loom.  (I did quite a few on my old loom, but not as many really long warps since I got this loom.)  Needless to say, I had some problems.  It seems I am still not able to count!  It looks like I wound different amounts in each section.  I was trying to wind 27 wraps on each section (my beam is 3/4 yard in diameter).  Oh well, at least I got the rugs all done and did not have to re-warp to finish.
The first section ran out at the end of the eighth rug.  Since rug #9 was leftovers, I only wove a 2' x 4' rug, so I pulled out that section and several others on the two selvedges.  But as you can see from the picture by time I was done with the ninth rug, my poorly measured sections really showed.


In weaving the rugs, the Macomber is a heavy loom, but I ended up adding weight to the beater so that the loom worked harder and I did not have to.  I wrapped five pound ankle weights on each end of the beater.
I think that my looms have used the weights more than I ever used them for exercising.


Because the rugs were so thick, I could only weave two rugs before the cloth beam was full.  It was almost touching the shafts.
There is only about an inch between the rugs and the shafts, not enough for a third rug.  I did not want to waste warp on tying knots, so I glued a dowel on the warp, cut in front of the dowel and then laced the dowel onto the cloth beam rod.  That way I only lost a couple of inches at each cut, and maintained the tension.
  Above you can see the black/tan yarn for the hem, then blue and white waste yarn, the dowel and then purple and white waste, ready to cut then start the hem for the next rug.  I put white glue in a double row about an inch from the hem.  When it is dry I cut between the two rows of glue and lace the dowel on.

I managed to get 9 rugs woven with the materials provided by the spinners and got them in the mail to the owner to give as Christmas presents.  This is the heavy corespun llama/alpaca fiber from the growers that Spinderella spins up and I am weaving rugs for her.

This series was for 3' x 5' rugs.  There are 8 rugs that size and a bonus rug that I made from the leftovers of the "bumps".  (The yarn comes in bumps of about 200 yards.)

Here is a picture that I took of the group of rugs.


I was really pleased with the rugs.  When there was 2 or more "bumps", I wove a solid colored rug.  Then, I started designing stripes with the remaining colors.  I love the shaded colors like the third rug from the left.  The fleece was different shades of color and when it was spun there were changes in the colors.  This gives the rug a shaded effect. 


I also liked a couple of the striped rugs.  The main color on this one was a larger bump, so I just added the dark stripes from what was leftover from the dark stripe rug.  
 

A couple of times I mis-figured the amount of yarn for one stripe rug and used the remainder on another rug.

It was a nice weaving experience and I hope I will get to do it again for another fiber grower. 

Monday, November 14, 2011

I need to Get Some Looms Emptied

I have been looking at four looms that need to have warps woven off for various reasons.  

The Dorothy has had a double weave warp on forever.  It is a narrow warp and do I really need to weave it or can I just trash it...I have problems with that.

The Baby Mac has the leftovers of a workshop this summer with Robyn Spadey.  The workshop was wonderful and I enjoyed weaving several great structures.  My loom has corduroy left on it.

The Baby Wolf has the dummy warp from the previous post.  I have continued to weave scarves and the dummy warp has behaved just great.  

The Big Mac needs to have the Faux Ikat woven off so that I can weave the rugs that need to be done by the end of the month.

I want to take the workshop with Judie Eatough that the guild is having.  Since I am not working now, I have the time and I would love to spend 3 days with my weaving friends.  I don't want to take the Dorothy, so cross that one off the list.

The Baby Mac will fit in my car, so I decided to work on it.  I invited my weaving study group to come and weave a sample of corduroy so that I could empty my loom.  They did a pretty good job, but there was enough left for a good sample showing different densities of pile...

Meanwhile, we got a new car...yea, I can now travel my Baby Wolf and then I could do an eight shaft pattern instead of a 4 shaft.  So forget the Baby Mac and put more time on the Baby Wolf.  I have been doing great with the scarves, but I do not want to take off the dummy warp until they are all done.

I have become pretty fast with the weaver's knot
Number 10 warp looking good
I'm getting lots done on the scarves, but I also have to be working on the Big Mac to get the shawl off and get started with the rugs.


For my Faux Ikat technique, I wind the commercial hand painted yarn so that the colors "pool".  It is pretty funny because I hate to have my yarn pool in knitting, but I work hard to get it to on the weaving.

Here's the warp on the loom.
 I decided to use a plaited twill for the structure and found a ten shaft one that I liked.  I ended up using twelve shafts because I did not have enough heddles on shaft one and two.  But it worked out well.


Aurora Borealis
The finished shawl looks great and I love the structure.


In fact, I liked the twill so well, when I found another skein of painted warp when I was cleaning up, I decided to tie it on the ends and weave another  shawl.  This one is for me.  

Here's my warp wound, in the bag and ready to take to the loom

When I started tying on the warp I realized that this is a different yarn, instead of three plys, this one is two ply and I have more ends when I finished the warp.  I had to add warp ends to the loom (twice because I obviously can't count) and I had to use all my repair heddles and even add string heddles to get the full width threaded.

Here you see the pink I added first then the blue that I needed.
 Because this yarn is thinner, I also needed to resley, but that is quick.

Beautiful warp ready to find a good weft for it.
My workshop came and I did not have a loom empty.  I attended without a loom and found that I got help with my weaving program and am able to look at it and feel I can use it.  Before I felt every time I started working with the program it was an exercise in frustration.  I took the lap top and worked on my program.

Judie is one of the top teachers in the nation about weaving programs and she was more that happy to help me get started learning my program.  I got to spend the three days with my weaving friends and watch the samples that they were doing...some really cool designs.  I  had some of my beginning weaving students learn some fun new stuff.  But I came home early Saturday with a cold that I caught from the Mr.  

Today I feel better after spending 24 hours in bed.  Maybe now I can get one of these looms emptied!!!

Thursday, October 6, 2011

I'm not supposed to be the dummy when using a dummy warp!

I know I'm not supposed to be the dummy, but with this dummy warp I sure have been.  

I made a commitment to weave some scarves.  I have two weights of yarn, decided on two sizes of scarf, and need to do two patterns (due to the colors of the two yarns).  I planned for the fine yarn to be woven in a Dornik twill, because I have two colors and white of that yarn.  (I will use a color and white for each set of scarves.)  For the heavier, I have several colors, so I plan to do stripe sequences in straight twill.  This will give a good variety of scarves and will test the weights and the time it takes me to weave them.

After thinking about the problem of putting on several different colored warps, I decided to have a dummy warp so that I would not have to re-thread each time.  (A dummy warp is one that stays on the loom and I just retie each color of warp on the already threaded ends.  It will save time and effort as I weave the four to eight different warps.)  I will keep the lease sticks in the dummy warp so that I can use the center section for the narrow width scarves and then add the side warps when I do the wider scarves.  I even figured out that with the eight shaft loom, I can thread a straight draw ( shafts 1 through 8) and weave the straight twill scarves, then change the tie up to do the dornik twill (without having to rethread the dummy warp)...I though I was so smart.

And it started out so well.  I found some old yarn in one of my storage bins (yeah, a little de-stash) to put on a 2 yard dummy warp.  It was only 120 ends for the widest scarf in the fine yarns that will weave at 12 epi  (the heavier yarn is 10 epi so it will only use part of the dummy warp).  I decided to start with the narrow fine thread warp, so I only threaded the center warps on the dummy.  I wound the warp for two scarves and started tying it on.  I was surprised to find that I had too many warp threads in the scarf...quick check and I realized that I had planned for 20 repeats of 4 threads and I wound 20 repeats of 8 threads...!?  That's ok, I can just weave a second set of scarves with the warp.  


My next surprise can when I tested the wash-ability of the yarn.  It was labeled super-wash wool/alpaca/nylon.  But with the sett I used, when I threw it in with my delicate machine wash, it really felted down.  It still feels real soft and it is not stiff at all, but it is really smaller than I wanted.


Great pattern, but not quite right.
I decided to just label them hand wash and continued with the weaving.  I ended up with two scarves that will be great.  I will just hand wash them to close up the weave some, but not as much as the washed sample.


Next problem is to put on the second half of the warp that I had wound in error.  I decided to make this warp wide for the second size of scarf.  This size is more of a men's design where you just fold it over under the coat.  Since this size is wider and shorter, I figured that folding the warp in half would work.  I just needed to thread up the two sides of the dummy warp so I can tie on the full width.


First BIG whoops, when I threaded the center of the dummy warp, I didn't leave a number divisible by 8 on each side.  In other words I only had 22 threads to fit into 24 heddles that I needed for the dornik pattern.  The extra two warps were left at the other side of the threaded ones.  So...I have to re-thread the dummy so that I have shaft 1 through 8 on all the repeats...Only 120 ends so just a short while, but isn't that why I put on a dummy warp...so I didn't have to rethread?


I tied the warp on the first half of the ends, and proceeded to fold the warp and tie the other end of the 5.5 yard warp to the remaining dummy ends.  Next BIG whoops.  About an inch in I found that I had tied 3 tan ends instead of the four needed for the pattern.  

"I'll just add another end after I wind the warp on the loom."


Several minutes later I realized that with the color and weave pattern that the dornik twill is, I had thrown off the whole pattern by putting 3 ends on the one section...


After I wound the warp on the back beam, I rethreaded the warp to have the colors and the threading match for the pattern.  Wait, I rethreaded AGAIN?  Where is this dummy warp saving any time or effort.


Who is really the "dummy" here?

Friday, September 23, 2011

On the film set

I got a call at eight in the evening to go to the film set the next day to teach the actors how to weave and spin.   Bad news is that I forgot my camera, something my sisters had said be sure to take.  Good news is that my contact at the set took some pictures of me to share.  

I spent the morning explaining why the set up they had for the "look" of the loom was not going to be able to weave.  Once we got the loom set up I spent a few minutes with the actor.  We were constantly interrupted with the things she was needed for...set the lights, run through  the scene, etc. 

While they were working with her, my contact give me a tour of the set...very impressive.
  
Here is a "street" in "Jerusalem"
I'm not sure what this area is being used for, but it was very interesting
 
During my break from the weaving lessons, and they found me three extras and to teach basic spinning to.  We had some spindles that the carpenters had made. These spindles had no balance to them to keep them spinning, and they were rough because of the "aging." The wool was dirty "range fleece" about 1" long, so not the easiest to learn to spin on.   But these women were great and we were getting continuous yarn after a little while.  My contact on the set was also interested in learning and he caught on quickly but was not able to practice due to the demands of his work.

I spent the next little while sitting in an undecorated (but cool with a breeze going through) room near where my "student" was being filmed.  I had brought my spindle and so I got a good amount of spinning done while waiting and when walking around.

After some time, the assistant director came in and said that the director decided that the actor would not be weaving in the film, but they needed a weaver to be weaving in the "street scene" and rushed me off to wardrobe and make-up!

I had my face, hands and feet painted a darker color and got eyebrows darkened and then was taken to the set.  I got some head gear adjustment by the wardrobe and then I helped the extra I had just taught to get her spinning started for the filming.


She had to pin the head gear so I could lift my arms to weave.


The extra had just learned to spin, I think she looks great.     

Here we are as the scene was filmed.

The door with the column, that you can see in the background though the arch is the one that I was standing next to in the first picture...Isn't movie making amazing!  In the movie, I may be seen few seconds in the background or it may be completely cut out, but it was lots of fun to watch it being done and to see the amazing set that they built.


Friday, August 26, 2011

Warp Weighted Looms

In the past month I have learned an enormous amount about a warp-weighted loom.  I got a commission to set up 3 warp weighted looms for a film and I learned by doing.

I started out be getting some pictures from the company and I proceeded to do research on the web.  There are lots of sources and people able to help.  I got some additional information and passed it on to the carpenters...warp beams have to turn, the heddle rod has to be able to move...basic things like that.  Some weeks later, I got 3 looms delivered to my house.  I had them put in the garage and I spent several days sitting and looking at them to determine what would be best to do.  

I thought about weaving a piece on my regular loom then attaching it to the warp weighted loom, but if I wove a band on the end that would be too time consuming.  I decided to go with the traditional method of weaving...as close as I could get and still get the looms finished.  

Rather than having a card woven band, I used my inkle loom and put a warp board next to it.  This way I could get a band with 3 yard fringe that would become the warps on the loom.
  
This is the third warp
I wove for 20 ends then chained them to rest on the floor while I wove the next group.


Here is the warp/fringe from the second loom

After weaving the width of the piece, I stitched it onto the warp beam from the loom.
I stitched every 2 warp ends
I found out that you need to watch where the knots are on the beam...this one was in the wrong place.  I guess then they would have known to watch for that and get a very smooth limb for the warp beam.


The finished warp looked great hanging there
Once the warp was on the beam, I needed to make a lease cross.  I found it was easier at this point to lift the cross, rather than when I was weaving the band.  I did that on the first one and made a mistake and had to redo the cross anyway.  The beam was at a comfortable height and I could easily run a thread to make the cross.


I put the beam on the loom and started straightening the warps.  You can see the groups or bundles of 20 threads here.


I now needed to  hang the weights and chain the warp to keep it straight.


This shows the back half of the warp weighted.


Chaining the warp is running a chain stitch across the with to space out the warps.  According to some of the experts I talked to this is not a necessary step, but with my loom needing to be moved by stage hands, I wanted as much safety built in as I could get.


This is process that I used, pretty basic
And here is the loom with both front and back weighted and chained.


I worried for some time about the heddles, the basic source book (that I heard and read about but was not able to get a copy) talked about "knitted heddles".  I finally found a web site that explained how to make them and showed an illustration.  The problem was this method can slip. I will be having actors work on this loom and it will be moved around so I went with the more secure heddle method from back-strap weaving...a half-hitch.


I used a netting shuttle to stitch each of these half hitches around each warp end and then made a half-hitch between each to hold it secure.


Stitching each half-hitch around the warp on the lease sticks
Artsy shot of the same


Here's a close-up
And here you can see the half-hitch
This step was pretty slow going, but fast compared to the time I spent staring at the loom and talking the anyone I could on the net.  My thanks to all of them for the help.


Once the heddles were tied on the first loom, I found that the angle of the uprights was too straight, they needed to be at more of an angle for the natural shed to hang right.


here the back layer of warps hang too close to the front
here they hang farther back to make a better shed.
By time I got to the second loom, I had learned enough to feel quite good weaving on it.  These looms are not ergonomically comfortable to weave.  You are standing the whole time and you are beating the warps up...against gravity.


I set up a shuttle to use to help get the weft across.  Because the first warp had a narrow shed (my lack of knowledge on how much space was needed), I used a simple stick.


It is really amazing how much yarn you can put on this shuttle and still have it quite narrow to fit in the shed without rubbing the warps.


Because the beaters the carpenter made were not delivered to me (they needed to be "aged"), I used a warp sword that I already had to beat in the weft.


This sword has worked great to pack in the weft.  I found that if I change to the next shed after putting the weft across, it is really easy to pack it in.  


This is the first loom finished, some weaving done and ready for pick-up
You can see a paper on the left hand upright, this is my notes to the carpenter for corrections.  The diagonal piece on the loom will be taken off, it is just for travel to stabilize the frame.  The heddle supports on the uprights were too short, I needed to have them remade.  Had I known more before I started I may have seen that, but it is a pretty minor repair.  The carpenter will also cut about an inch or two from the supports in the back of the loom to correct the angle of the uprights.  When I was weaving I just put some wood under the front uprights to cause them to tip back.  It worked for me but I want to have a corrected stable loom for the actors.


Loom Two was just two uprights that leaned against the wall
The second loom I threaded was just uprights leaning against the back of my garage.  I was surprised how easy it was to weave on...the angle was correct, but there was no shifting of the loom.  The warp beam at the top and the cross piece at the lower part seemed to hold it together quite well.


When they came to pick up the looms, I had them bring drop cloths.  They lifted the warp beam and then wound it down enclosing the heddles and then laying the weights on the drop cloth and wrapping the whole thing up.  I think that is a good way to travel the looms.


Here is loom three
The final loom worked up quite well.  I'm not sure I like the River Birch for the uprights, it looks a little rough to me.  But it is not my vision that the piece needs to fill.


While I was putting these together, I thought...I could make one up for me, it is an interesting historic artifact,... but then I decided I do not have enough time to weave on the looms that I have, so when would I do this...I never need to demonstrate this period of weaving.


As  side note, I have lost my job of eleven years.  There was a big reduction and I decided to take the package and move on.  Working there has been less enjoyable for the last couple of years, but I will really miss the people that I worked with.

I am not sure what my next act will be...but it will all work out well.  

I'm hoping to get my Bergman loom working in the time I spend at home and looking for a job!