summer flowers

summer flowers

Wednesday, July 3, 2013

June Gone and no blog

I feel bad that I did not get a blog written for June, that messes up my blog goal for the year.

I have been down in the dumps due to changes in the studio where I teach weaving.  I'm sad to say we lost our lease and even though negotiations are going on, I think we will have to move and I'm not sure about our continuing status.   Oh, as long as there is a space, and the looms are available, I will be teaching...but change is hard on me.

When I came into the organization, the previous teacher left to live near her family.  She was not a loom technician, so the floor looms all needed cleaning and repair.  I have spend the past 9 months with full beginning classes ( I even had to roll some students into the next class because there were not enough looms), cleaning 30 to 40 years of dirt and dust off 8 floor looms and communicated with the loom companies to get parts and get all the looms working well.  I figured I am not going to make new weavers if the equipment is not working well.

The beginning class is on table looms.
Here they are half way through cleaning.
I feel like I have invested a lot of time and energy to keep this studio going.  I know the previous teacher did too.

I need to just let go of these feelings, continue my crafts and know that all will work out as it is supposed to.

Enough of the "downer", let's see some fun stuff.

My class last week was warp painting and we had a great time.  I demonstrated one night and they came with warps ready for a Saturday play day.

Here is my class on their warps
In this class we paint the stripes to weave some towels.
This is the threading that I give to them.
The warp I demonstrated is a 12 yard cotton/rayon scarf warp that I have been designing.  I did the first scarf warp just stripes and some inlay, so I decided that warp two would be great with stripes of warp painted yarn.  
Here is the test warp batching and the color test paper.
I painted a pale yellow yarn with hot pink, yellow gold (dulled to mustard), apricot and avocado (lightened with yellow).  These are Procion dyes, as we are working on cotton.  I was dyeing a cotton rayon slub yarn.  I liked this yarn as a cotton scarf in the first warp, so it was logical to make more warps and more scarves.
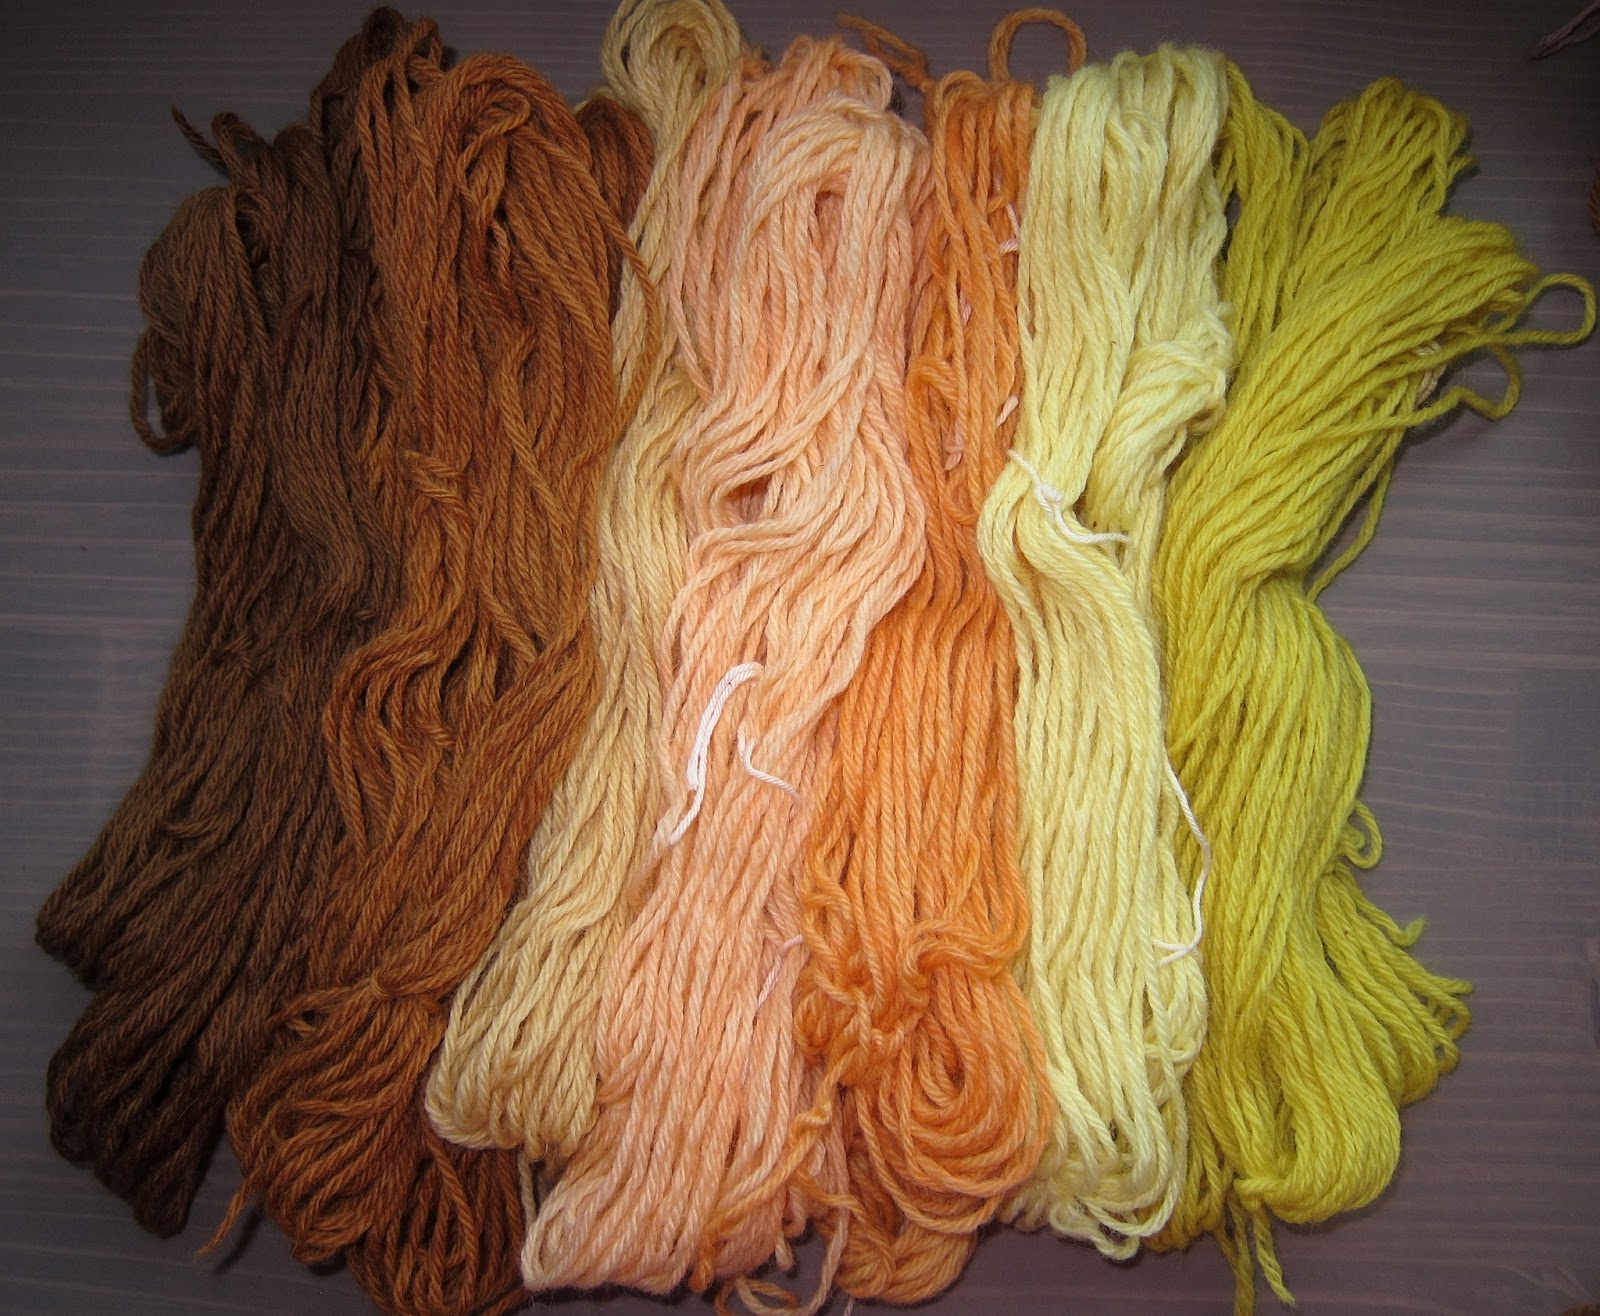
Here's the cone of yarn and the washed warp I painted.
The  12 yard warp is four scarves, so I over-dyed some skeins for weft also.
The value of the weft is very similar to the warp.
Four scarves and four wefts (three I dyed and one the original color).  

I also got an interesting by product with this painting session.  I decided to use a silk scarf to wipe up any excess dye and I got a nice gold, apricot  and a little pink scarf.  It turned out pretty boring, so I think I will add another layer of color...sometime.
Simple and uninspiring 
You may be able to see pressing lines on the scarf, I have already started pressing the fold lines to do a shibori fold and dye process.

Here is another picture of the "wipe up cloth" and the painted warp.
I had so much fun with the warp I demonstrated and there was dye left over, so I came home and wound another warp with the cotton/rayon and started painting again.  This time I chose the blue for the warp.  I think that the colors will "tone" the warp so the scarf has some pattern.  I guess this warp will be turned twill so show off the colors shifting and maybe I will over-dye some  more weft.
The blue warp looks a lot darker wet.

I decided to dye the whole warp not just stripes.  And I offset the six sections so that when I paint a stripe, the color will be diagonal on the finished scarf.  I painted four scarves again, and I am really curious as to how the color will look.
Bad picture showing the offset on the warp sections.

I used a wider variety of colors, so that each scarf will be toned differently.  One is darker blues and purple, one over-dyed with yellow and green...I just used any of the colors left over from the class.
Four rows of color to make four scarves.
I am excited to rinse our the warp, but because I am driving north for a couple of days, it will have to wait.  
Second "wipe up" scarf
I wiped up the dyes with another silk scarf, and because of the wider group of colors, I think this one may be good without another layer of design...or maybe not.  When I was finished with the dyes, I just scrunched this one up and let it batch.

Now I just need to empty a loom so that I can get the scarves woven.  I had planned to warp one of the looms in the studio...oops, there is that depression again.

Scarf warp.
Here is warp #1 of this cotton rayon scarf series.  I wove this on one of the studio looms.  It was partially a test to see if I could get a long warp on the beam without paper...I put 12 yards on and there was no problem with the tension.  By the way, this picture shows the blue in the warp and that weft stripe that I painted in warp #3 above.


Tuesday, May 28, 2013

Driving the Mirror Lake Highway

Mirror Lake Highway opened Friday before Memorial Day.  This is unusual, most years it is not open until around July 4th.  We had a low snow year and the road was able to be cleared.  My DS and I wanted to see it in a different time of year, so we drove up.

Driving up the canyon past Park City was beautiful.  The hills were deep green, once the grasses ripen in early summer, the hills are more gray-green and brown, so the hills seemed so spring like and fresh.  

We stopped at the Kamas market for drinks and snacks and started up the road toward the Unita Mountains.  These mountains are the highest mountains in the US that are running east/west.  They are greener in the summer and have interesting plants.  I have been driving through them and camping there since is was a child.  My Dad always loved camping and fishing up here.

We got to Soapstone Basin and the Aspen trees were starting to leaf out already.  They were a beautiful yellow green against the evergreen trees.
Green Grass and Aspens
The Provo River was running fast and I am sure it was cold, I did not want to test it and so I just took pictures of it.
Provo River at Soapstone Basin
Soapstone Basin is where the road is usually blocked off for the winter.  Last year we were up here in June and were not able to drive up the road...we drove up a little way, but there was too much snow to continue.

On this trip, we stopped at several overlooks to see the views.  Here the river was down below us and we are starting to get into the snow patch areas.
Just to the right in the picture, there is a little patch of white, that was a large snow patch.  The rapids are rushing down the river.  I love the look of the white water.

We stopped at the Upper Provo River Falls, like we always do.  This was the highest and fastest I have ever seen the river and the falls.

Usually, my DS will climb down by the falls, and you can usually see the stair step stones that form the cascade that we call the falls.
Here's a view from 2010
The rock on the right side of the picture from 2010 is the same one that is on the upper third of the picture from 2013.  There is a lot more water coming down from the snow melt this time of year!

I also got to take some pictures of the flowers.  There were Dog Tooth Violets and the Mountain Spring Beauty that I love so much.
Mountain Spring Beauty
These flowers come up in early spring, and are only 1/2 to 3/4 inches across.  I did not see them for several years, because by time I got up in the mountains, they were gone for the season.  It was great to see them this year and enjoy their beauty.

Driving past Lily Lake and Teapot Lake, they were about half covered with ice.  The reservoir at Lost Creek Campground was full.  We always refer to this as Lost Lake...I don't know if that is the real name.  
Lost Lake in September
Here is a picture from the fall.  All the brown on the right side of the picture was under water this weekend.  It was fun to see the lake that full.  There were fishermen trying to catch their fish dinner.  It really looked like a fun day for them.

By time we got to the summit, the snow was about three feet deep at the sides of the road, and not many of the trail heads and camp grounds were open.
Snow along the highway
We drove all the way to Mirror Lake, but that road was under snow.  But through the trees, we could see that the lake was frozen over.  It would have been fun to get closer, but that was about a mile through three foot deep snow, and were were not dressed to do that.

We stopped back at the summit to get some pictures.   The cornice on Mt. Baldy looked like it was  twelve to eighteen feet.  It is hard to tell through a camera lens.

Cornice on the mountain

Here's a little closer view

I loved the way the snow had melted to form "snow Hoodoos".  We see redrock hoodoos all over southern Utah, but these were just melted snow.
Snow Hoodoo
Where the snow had been plowed up along the side of the road, I guess the rocks heated differently than the road, so we got these great shapes several places along the road.

DS taking pictures of the view
Every where you looked, there were beautiful views of trees, snow and sky.  It was a great Sunday drive and fun to see the area at a different time of year.  I felt like I drove from Summer in the valley through Spring in Park City & Kamas and into Winter in the mountains. 
I read in the Sunday newspaper, that another person driving up there decided to come back with his snow board to enjoy the snow that is left up there.  With the temperature in the 60's during the day, he had better hurry before the snow is gone.


Saturday, May 25, 2013

Spinning, Knitting and Some Weaving

I feel like I have not got anything done.  Then I look at the things around me.  

I have been having fun spinning.  It started with the dehairing of some qiviut.  I had about 4 and a half ounces of down, I think it was partially dehaired.  
After the dehairing machine
A friend has a dehairing machine and I ran it through five times.  It got out almost all the really coarse hair and the dandruff.  And I had three ounces left to be able to spin.  That should make a nice project...should I ply it on itself or with silk?

Waste from machine

I wanted to spin it quite fine, so I decided to practice on some other fiber first.  I bought some roving that was dyed to give a gradiance of color from green to rust-red.  I got two rovings to spin for a shawl.  I wanted to keep the color change, so Navajo three ply is needed and I need to spin it very fine to get a fingering or light sport weight yarn.
You can see some of the color change of green to red
It was good practice and I finished both rovings.  Above you can see the singles on the first roving.  Below is the first bobbin three plyed  As you can see, I am auditioning for needle size.  (When did we start saying "auditioning" instead of sampling?)
Here you can see the green
I wound the ball with the red in the center, it will be fun to knit and see the color change.  I want the shawl to have green on the two ends and the red in the center.  It will be a rectangular shawl, with some lace stripes in it.  


This served as a good practice for the qiviut.  But I had a small bag, about 2 ounces of an alpaca and flash blend.  Since the spinning wheel was out and available and since it was such a small amount...I spun it up.  I wound it in a center pull ball and plyed it, but it looks like I did not ply it enough...maybe I will run it through the plying wheel again.  I will spend some time with that wheel, because I need to 3 ply the second bobbin of the gradiance dyed roving also.
not plyed enough, and what will I use it for
So now I have practiced and am ready to spin the qiviut.  I tried carding it on cotton carders, but I found that just taking a handful from the bag of down spun as well and as easily as the carded down.
Getting started with the yarn
As I was spinning, I noticed a few dark hairs, so I decided to start the spinning process by first taking out any the additional hairs by hand.  This is a job for early in the day and over a white surface so that I can see the hairs.
Here's what I took out of the first handful
There are several types of hair, the really heavy long ones, about 6 to 10 inches long.  A couple of them are here and most of them came out in the dehairing machine.  Then the heavy short hairs, they are darker than the down and straighter, so they show up well.  Then there are the finer more kinky hairs.  These are harder to find, I take out as much of them as I can easily see and just try to forget about the rest.  I place the remaining down in a bag for spinning later in the day.  I am sure that the yarn will be soft and I will enjoy it.  I am really not sure what I want to make out of it.  It probably is best for knitting, and three ounces gives me some possibilities.


I have also been doing some knitting.  I had a couple of ounces of fine cobweb weight yarn that Jim at Spinderella did.  It is wonderful...I think a cashmere, wool, maybe silk blend.
Here is the yarn
Since I only had a small amount, I started a triangle shawl.  I decided I would just knit until I ran out of yarn.  I figured I would have a small shoulder shawl for those cool evenings.  The pictures show it before and after blocking, you can see the yard stick for comparison. 
Unblocked
Blocked
I knit it up on size 5 needles and it is very light and airy.  I am really pleased with it and now I can start the handspun 3 ply above.
Yes, delicate as morning dew


My weaving at home is at a stand still.  I have done nothing...maybe since we are not traveling for the holiday week-end, I can kick start it and get something done again.


I have been getting some weaving done at the looms at The Pioneer Craft House.  I put on a 12 yard warp for some cotton/rayon scarves on the Gilmore X.  I think they will work great for summer.  They are light and airy.  (Is that the code word for this blog today?)  
Plain weave with a twill inlay
I only have the two colors and this is a mill end yarn that I bought some time ago and just found during a cleaning.  (You know, "what is in this box, and why am I holding on to it?)  I think that I want to do a blue series, too.  These are fun to weave and they also weave up pretty fast.  I wound the full 12 yards on the loom without paper to test the length that I could put on this loom.  Yeah, 12 yards is too long.  I need to either find the pegs that were taken out of the sectional beam or add paper when I put on a warp this long.  I had no trouble when I put on a linen warp five yards long, but 12 yards, even with this open sett, builds up too much.  Oh well, I will weave the scarves, and I have learned another trick to remember with this loom.

I also put a small warp on the Hammett for some rag bags.  It looks like I should have allowed more for take-up and shrink.  The next warp will be an inch wider.  I got some more practice with the AVL warping wheel though.
How do you like my peg covers?


Sunday, May 12, 2013

Natural Dyes

I have not done a lot of natural dyeing for several years.  About twenty years ago, I did lots.  It was fun to go out into the fields or mountains and collect plants, then come home and see what colors I got.  I got lots of gold, brown and blah beige.  I ordered some plant and insect materials and got brighter and more exciting colors.  

A couple of years ago, I took a class and did mud dyes and stenciled and stamped with natural dyes.  We were using dye extracts and got great colors.  In some cases I put more layers on the fabric than I should of and ended up with mud... but there were some fun samples, too.
Here is the scarf I did in that workshop

This spring at TPCH, the gardening instructor suggested a combined class; planning and planting a dye garden and using the plants for dyes.  I was teaching the second class with using the plants for dyes.  Unfortunately, our dye garden was torn up for new sidewalks last fall and we are just getting plants back into the new one...so I needed to collect something for the class and this is early in the year to find much.  I ended up gathering dandelion blossoms for the first bath, the wood worker gave me paduak sawdust for the second dye bath and I found a jar of Brazil Cherry sawdust that had been soaking in alcohol for a year.  (It had been left by the previous textile instructor.)  

I decided to do the dyes in a canning pot so I set up two jars of each dye bath for the student's yarn samples.

Bottles ready for yarn to be added then processed.
The first two bottles are from the dandelion (greener than I expected, I just steeped the blossoms), the next two are from the paduak soaked in water for 2 weeks, the fifth bottle is from paduak soaked 1 week in alcohol (I expected a red color from the paduak, so tried soaking in alcohol to get a deeper, redder color)  the last two bottles are from the cherry.

The yarns I used were some knitting weight wool yarns and they ended up looking great!
Cherry, paduak in alcohol, paduak in water, dandelion
Unfortunately,  I had not tested the hot plates that we have at the class and they did not work.  After three hours on high, I could still stick my hand in the water.  I took the dye baths home and simmered the jars for 60 minutes.  I still had some color left in the dye bath, so I added some more yarn (all of the yarn was pre-mordanted with alum).  I also had some left over dye bath that didn't fit in the original jars so I added that and got some exhaust colors.

I had a fun time in the class, the class members got some great colors and I guess I will weave a scarf or something with some great color stripes...or I could knit a hat.

Monday, April 29, 2013

Old Textiles

I have started teaching at The Pioneer Craft House in Utah.  The art institution was started in the late 40's by two weavers, Mrs. Glen Beeley and Mary M. Atwater.  Mary did not stay with it, artistic differences between the two women.  But both of them left a legacy that I hope to continue.

In order to do teaching on the equipment here, I had to clean, oil and repair each of the floor looms.  Out of the eight looms only the two Hammet looms don't have companies still making looms.  I had the instruction manual fro them, and it gave the bolt and screw sizes, so I was able to get them working.  I had to drill and replace a worn screw with a bolt on one brake and now it is holding very well.  I have gotten parts and help from Gilmore Looms, Harrisville Designs, Macomber and Leclerc.  I am working on the last loom now.  

In most cases, besides the dirt and dry wood, brake problems have been the main problem.  But a few bent treadle rods and replacement aprons have been in the mix.  It is so great to sit down to a loom that is working well and that looks good.  I have straightened the heddles (I have a ton of them for replacement.) and put on or ordered more tie-ups for the treadles, too.

Another part of the clean-up here is the old textiles.  There have been a large number that have just been tossed, old student work that even they did not want, etc.  But there have been a few treasures.  I have an old coverlet, 1800's according to Sharon Alderman, that is hand spun and dyed with indigo.  I will need to clean it this summer, Sharon gave me some help with how to do this.  It has two panels and they have been stitched crudely with heavy waxed linen, so I may remove that stitching and re-do it.  We will have to see when I get it out again and check it closely.  

 I have also found a large number of interesting examples of weave structures.  I washed and in some cases hemmed a number of pieces and made a display for the studio.


I think most of these pieces were woven in the 1940's and 1950's and they all were VERY dusty.  They must have been sitting and collecting dust since almost that time.  There is a large collection of overshot weaving.  I think that was a favorite weave for them.  I also have  fragments I may mount for class samples.


There are a couple of pieces with labels from the weaver.  I have seen her name in my reading of old "Handweaver and Craftsman" magazines and I found letters from her in the files.  Her name is Kate Van Cleve and she wove and wrote about weaving in the 1930's and 1940's.  The lace pieces that we have a great and there is a baby blanket in basket weave that is the only basket weave piece that I have see that is stable and nice.  It is woven in very find wool, so the floats create no problem in the finished piece.  (I am very concerned with making structurally sound weaving.)  Unfortunately, there are some moth holes in the piece, but it is not too bad.  I can still use it as a great example in my beginning weaving class.  Again, the dust in the piece was awful, but now that it is washed, it is great to show.
This place-mat and napkin in Huck lace is beautiful and has a different look than the Huck we see now.  I think the place-mat is a little softer than what I like for a mat, I see the weight as better for a table cloth.


The other place-mat is also a soft one, but the structure has me thinking of how I could use it.  She has woven a three thread Huck, but she theaded two threads next to each other on shaft three.  It give and interesting look and it is different from the regular four thread huck.  


Here is a close-up.  The doubled threads on shaft three make give a texture in the plain weave area and the two shots of metallic are at the top of the hem.  There is a lot of metallic threads in these old weavings.

There are also a number of Guatemalan pieces (mostly tourist stuff) and some interesting stitchery on table cloths.  I will have to get some pictures of them.

I also got my heavy weight towels hemmed.  I am very pleased with them.  I will probably put a couple in the drawer for use and them keep some out for using later.
I ended up with seven towels and a plaid table mat.  I have two towels that are the plaid, three that are white weft and one each of blue weft and gold weft.  It was a good test of the loom and now I have a new group of towels.  

Thursday, April 18, 2013

My Heavy Weight Kitchen Towels

A few years ago, a friend bought some heavy kitchen towels that were handwoven.  I realized that they were woven with 8/4 carpet warp.  This is a yarn we had a lot of in the LYS.  I decided to try weaving and using heavy towels to see if I liked using them.  I wove some towels for my sisters and myself to try, and I liked the heavy weight.  I still like finer threads for towels, but these are fun to make and use.

I wrote about some pink towels I wove for a friend a couple of years ago.  Now I have woven another set of towels.  These were warped to test out a loom I had just cleaned up and repaired at the studio and to test an AVL warping wheel.  


Here's my second "wheel" warping 
My weaving study group came to the PCH weaving studio to show me how to use the "Wheel".  One of them has one and has been working with it.  This wheel had been put together backwards and we really needed to work on it to get things going.  We wound a six yard warp (three times around the wheel) to put on the Hammett Loom that I had just finished cleaning and setting up.  (An interesting side note, I thought we were putting on 6 yards, but 3 times around a 3 yard wheel gives a nine yard warp!!)  The picture is from my second warping on the second Hammett Loom.  But now the wheel is working great, amazing how much better it works when the parts are on right and the washers and nuts are in the correct order.

My towel warp was a nice striped piece...I had over dyed some yellow 8/4 to get a gold color and added some white and blue from my stash.  
Some towels woven one color and some woven plaid
The weaving was fun, but as usual, I just started the hems with plain weave, and it probably would have been better to use basket weave.  Basket weave washes up better so the hems lay even.  

The test on the loom went well.  I found that the screw holding the brake pawl on the ratchet, indeed, needed replacement...it gave out about yard 5.  I had figured that I would need to drill a hole and replace it with a bolt, but I had hoped that it would hold until the warp was done.  I removed the pawl, drilled the back upright and put a new bolt to hold the pawl.  The loom worked great and no problem with the brake holding.  Of course, using a ratchet brake is not as easy as a tension brake, but you get used to how to "finesse" the tap on the brake release pedal.

I knew the rug class was coming too fast (they needed this loom) and the plaid pattern was taking too long to weave with all the unplying and tucking in the ends with each color change, so I did the fast thing....I wove and  just let the ends hang out to finish later.  It worked, I got the towels off the loom and students were able to warp the loom for rug samples. (For the rug class I cleaned, oiled and repaired six looms...luckily, I had the help of a couple a great students.  Now I only have one more loom to repair the brake and get it weaving.)


But that left me with lots of ends to finish once it was off the loom.
Here are the ends I needed to weave in
I have started to unply the yarn/thread and tuck only part of the ply back into the weaving.  I found this method in an old weaving article by Bertha Frey.  To do it I un-ply the weft back into the web.  I leave one ply there and use the other two plys to finish the pick and wrap around the end warp, then tuck one ply in about 1/2 inch and the other ply in about 1 inch.  Hard to explain but a great way to make the color change disappear.   With the towel off the loom, it took a little longer but still gave the same great look.
Here the gold and white are unplyed
In the picture you can see that one of the three plys is unraveled back into the woven web.  I then need to needle weave the two plys back into the web, catching the outside warp end.
Here the white is needle woven past the first ply
It takes a little more time to do this method, but I like the result better and I am willing to take the time for a piece that I will be looking at.
Here the ends are needle woven back in and trimmed
Here is the finished edge...the color changes are almost invisible.  I love the way this looks and it makes me happy every time I use the towel.

After the ends were woven back in and any errors were corrected I washed the towels a couple of times.
Fabric washed and unwashed
You can see how magical wet finishing is on fabric.  The fabric goes from warp and weft threads to fabric; the spaces close, the warps and wefts find their proper places and the fabric feel softer.  Now I can turn under the hems and stitch them up.  I am currently in a hand finishing mood, so I will hand stitch them.  But machine stitching is fine and I will do that when I am in a machine finishing mood.


My current project on Hammett II
Here is my test for the second Hammett loom.  This one was another warping wheel demonstration, but only 4 yards long.  The Pendelton "worms" and warp were purchased years ago.  I thought I purchased enough of the tan yarn for the full warp, but I must have used some of it over the past 20 years.  It's hard to see, but if you look under the beater, you can see about an inch of space left between the finished rugs on the cloth beam and the beater.  At this point, I was worried that I would not be able to finish the rugs (two of them), but I managed to squeeze  the last few inches on the rug to use all of the "worms" or selvedges that I had purchased.  The only problem now is the color...not quite the colors that I have in my house now...oh, well. 

I will probably leave the rug on the loom until something else needs to go on.  The loom looks so much better warped and weaving that bare.