Friday, October 5, 2012

New Shawls and a Scarf from the Thrums


I was asked to design a shawl using an alpaca yarn.  I have had the skeins of yarn for a few months.  I had planned on weaving it in the design that I had used for some wool shawls some years ago.  I went through the old weaving notes and found the draft.  I was surprised to see that I designed this shawl in the 80's.  It is a loosely woven Bronson Lace and I really like to play with the design.  Since the Bronson is a block weave, I can vary the design by weaving lace in different blocks on each shawl.  I ended up putting enough warp for two shawls for this test run.


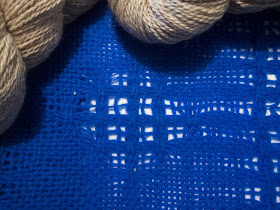
Blue sample from my original pattern test and alpaca yarn above it.
I remember when I wove the sample.  It was loosely woven and I was sure when I put it in the wash to full, that it would dissolve like cheesecloth.  I was so pleased when the washing set the structure and opened the lace.


Notice that there are no more heddles on shaft one and more yarn to thread
Atwater-Bronson Lace is threaded with every other thread on shaft one, so you need to count your heddles before you start threading.  I though I had counted right...but not so.  There was no real problem because I had left the extra 5 heddles on the right side before I started threading (I thought there would be five extra heddles on the left side too).  Heddles are easy to move on the first shaft, I put a safety pin on the upper loop and the bottom loop, slip them off the right side, then put them on the left side and take off the pins.  I was able to finish the threading easily.  The weaving went well too. 

Plain weave on a Bronson threading is lifting shaft one against lifting everything else and sometimes shaft one will lift with the "everything else" treadle.  With this loose of sett (6 epi) I did not have trouble with shaft one lifting so there was no need for extra rubber bands added to shaft one.

Shawl two in the weaving, loose sett and squares of lace
  I keep the tape measure pinned to the shawl as I weave.  (I pre-punch holes in the tape so that the pins don't have to punch through each time...I really miss the old fabric tape measures.)  

The first shawl had a pattern of diamonds on it and the second is stripes and squares.  I worked with graph paper for a while to get the patterns that would work on this threading and those two were my favorite.  
Shawl two with stripes and squares.

Shawl one with diamonds


I had a couple of yards of warp left, not enough for another shawl and too much for a sample, so I just cut off the shawls and fulled them.  Shawl one was fulled in the wash machine, agitating for 4 minutes.  Shawl two was fulled on the rolling felting machine for 10 minutes on each side.  I was curious to see if it would felt/full up as nice on the machine.  I was surprised that it felt softer and the fringe finished nicer.  I may try the roller more often to full my work.

Here you see the comparison of unfulled on the left and fulled on the right.
Because I put the warp on back to front, the 2 yards remaining were uncut at the warp beam rod, and were 4 yards long.  This is long enough to make a scarf, so I decided to weave a scarf in the same structure, but with a sett of 8 epi to compare the finished hand of the fabric.

Here you see the slip knot 
I put several slip knots on each group of threads as I pulled them off the loom to keep them in order.  I threaded the loom from front to back in a smaller version of the Bronson Lace blocks.
After threading, groups look bad, but have the slip knots.
I kept the warp as tidy as possible, and all the groups are held in place with the slip knots, but it does have the look of "spaghetti" in the picture.  Once the threads are tied to the back, and have something to pull against, I know that they will straighten out just fine.

And I tied an overhand knot in each inch of warp threads.  To attach the knotted groups of warp ends, I borrowed some heddles from my inkle loom and looped them on the warp beam rod.  

Putting the knotted warp through the loops.
Here's the loop heddles, used to "lash" on the warp.
I really like the loops to attach the warp when I go from front to back.  In this case, they are a little long, they could easily be half the size, but I just grabbed some from the inkle loom.  I need to make a few especially for this loom.

The warp wound on perfectly and I'm ready to tie on.
As I suspected, once I tied one end of the warp, I was able to get it straightened and it wound on easily.  I will be weaving off the scarf this week and I am deciding if I want to try fulling it on the roller felting machine (she is named "Proud Mary" by the way..."she just keeps rolling along").  When using the machine, the end on the outside of the roll fulls more, so you need to re-roll the project to full the other end.  It may be over-kill to use Proud Mary for just one scarf, but she could really speed up the fulling for a group of scarves!

Another view of shawl one tied like a scarf.

1 comment: