Friday, August 26, 2011

Warp Weighted Looms

In the past month I have learned an enormous amount about a warp-weighted loom.  I got a commission to set up 3 warp weighted looms for a film and I learned by doing.

I started out be getting some pictures from the company and I proceeded to do research on the web.  There are lots of sources and people able to help.  I got some additional information and passed it on to the carpenters...warp beams have to turn, the heddle rod has to be able to move...basic things like that.  Some weeks later, I got 3 looms delivered to my house.  I had them put in the garage and I spent several days sitting and looking at them to determine what would be best to do.  

I thought about weaving a piece on my regular loom then attaching it to the warp weighted loom, but if I wove a band on the end that would be too time consuming.  I decided to go with the traditional method of weaving...as close as I could get and still get the looms finished.  

Rather than having a card woven band, I used my inkle loom and put a warp board next to it.  This way I could get a band with 3 yard fringe that would become the warps on the loom.
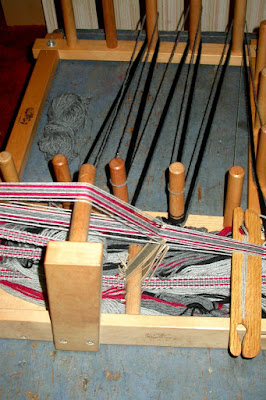
  
This is the third warp
I wove for 20 ends then chained them to rest on the floor while I wove the next group.


Here is the warp/fringe from the second loom

After weaving the width of the piece, I stitched it onto the warp beam from the loom.
I stitched every 2 warp ends
I found out that you need to watch where the knots are on the beam...this one was in the wrong place.  I guess then they would have known to watch for that and get a very smooth limb for the warp beam.


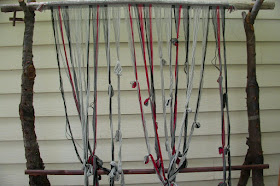
The finished warp looked great hanging there
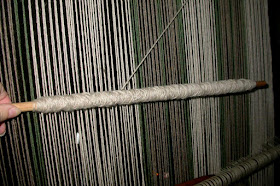
Once the warp was on the beam, I needed to make a lease cross.  I found it was easier at this point to lift the cross, rather than when I was weaving the band.  I did that on the first one and made a mistake and had to redo the cross anyway.  The beam was at a comfortable height and I could easily run a thread to make the cross.


I put the beam on the loom and started straightening the warps.  You can see the groups or bundles of 20 threads here.


I now needed to  hang the weights and chain the warp to keep it straight.


This shows the back half of the warp weighted.


Chaining the warp is running a chain stitch across the with to space out the warps.  According to some of the experts I talked to this is not a necessary step, but with my loom needing to be moved by stage hands, I wanted as much safety built in as I could get.


This is process that I used, pretty basic
And here is the loom with both front and back weighted and chained.


I worried for some time about the heddles, the basic source book (that I heard and read about but was not able to get a copy) talked about "knitted heddles".  I finally found a web site that explained how to make them and showed an illustration.  The problem was this method can slip. I will be having actors work on this loom and it will be moved around so I went with the more secure heddle method from back-strap weaving...a half-hitch.


I used a netting shuttle to stitch each of these half hitches around each warp end and then made a half-hitch between each to hold it secure.


Stitching each half-hitch around the warp on the lease sticks
Artsy shot of the same


Here's a close-up
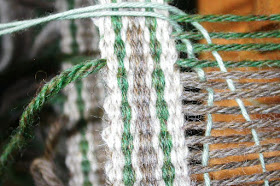
And here you can see the half-hitch
This step was pretty slow going, but fast compared to the time I spent staring at the loom and talking the anyone I could on the net.  My thanks to all of them for the help.


Once the heddles were tied on the first loom, I found that the angle of the uprights was too straight, they needed to be at more of an angle for the natural shed to hang right.


here the back layer of warps hang too close to the front
here they hang farther back to make a better shed.
By time I got to the second loom, I had learned enough to feel quite good weaving on it.  These looms are not ergonomically comfortable to weave.  You are standing the whole time and you are beating the warps up...against gravity.


I set up a shuttle to use to help get the weft across.  Because the first warp had a narrow shed (my lack of knowledge on how much space was needed), I used a simple stick.


It is really amazing how much yarn you can put on this shuttle and still have it quite narrow to fit in the shed without rubbing the warps.


Because the beaters the carpenter made were not delivered to me (they needed to be "aged"), I used a warp sword that I already had to beat in the weft.


This sword has worked great to pack in the weft.  I found that if I change to the next shed after putting the weft across, it is really easy to pack it in.  


This is the first loom finished, some weaving done and ready for pick-up
You can see a paper on the left hand upright, this is my notes to the carpenter for corrections.  The diagonal piece on the loom will be taken off, it is just for travel to stabilize the frame.  The heddle supports on the uprights were too short, I needed to have them remade.  Had I known more before I started I may have seen that, but it is a pretty minor repair.  The carpenter will also cut about an inch or two from the supports in the back of the loom to correct the angle of the uprights.  When I was weaving I just put some wood under the front uprights to cause them to tip back.  It worked for me but I want to have a corrected stable loom for the actors.


Loom Two was just two uprights that leaned against the wall
The second loom I threaded was just uprights leaning against the back of my garage.  I was surprised how easy it was to weave on...the angle was correct, but there was no shifting of the loom.  The warp beam at the top and the cross piece at the lower part seemed to hold it together quite well.


When they came to pick up the looms, I had them bring drop cloths.  They lifted the warp beam and then wound it down enclosing the heddles and then laying the weights on the drop cloth and wrapping the whole thing up.  I think that is a good way to travel the looms.


Here is loom three
The final loom worked up quite well.  I'm not sure I like the River Birch for the uprights, it looks a little rough to me.  But it is not my vision that the piece needs to fill.


While I was putting these together, I thought...I could make one up for me, it is an interesting historic artifact,... but then I decided I do not have enough time to weave on the looms that I have, so when would I do this...I never need to demonstrate this period of weaving.


As  side note, I have lost my job of eleven years.  There was a big reduction and I decided to take the package and move on.  Working there has been less enjoyable for the last couple of years, but I will really miss the people that I worked with.

I am not sure what my next act will be...but it will all work out well.  

I'm hoping to get my Bergman loom working in the time I spend at home and looking for a job!

Saturday, August 13, 2011

A Weekend in Nevada City Montana

My DD had been wanting to go back to Nevada City/Virginia City for a couple of years.  We had been there on one of the bus trips with the walking tours I used to take with Mom.  Nevada City is a ghost town, it had been gold mining but died out.  It was bought in the early 1950's and the owner started buying up old log buildings and artifacts to make an outdoor museum.  It has since been purchased by the state of Montana and each weekend in the summer, they have demonstrators in the museum with volunteers talking to you in first person - like they were living there in the 1840's.  It is a great place to visit, stay and enjoy.

We got a room in the Nevada City Hotel for a couple of nights.  Here is part of my family relaxing in the back balcony of the hotel.
Relaxing after the Drive


Here is the view from the balcony showing part of the open air museum.


We had a great time wandering around the museum, I took pictures of buildings, architectural details, interesting artifacts and doors.
My DD with the new hairstyle enjoying the museum

Can you believe that waistline?
One building was just old music machines in working order.

While we were listening to one of the music machines another tourist (from Germany) came up and asked if we could identify the music.  He told us it was a medieval mining song and he proceeded to sing it to us.  It was great!


We also spent time walking around Virginia City, about a mile away.  That town is still alive and entertaining.  We ate at a great fine dining restaurant, visited a couple of saloons, checked out the architecture and went on a ghost walk one night.
Checking out the interior while I tried to take a picture of the door
Here is a creepy fortune telling machine
My DS wanted a picture of the sunset so we went to Boot Hill.  

When we were on the ghost walk, the guide was talking about the floating orb pictures that many of the ghost hunters took at many of the buildings that we were visiting.  

Here is the un-retouched pictures I took at Boot Hill.
 The pictures just before and just after (I always take several in hopes that one will look good) did not have the  "orb"...wild huh?  I guess I got my picture of the ghost orbs...

On the last day we checked out the old rusting mining machinery that was collected.  After the miners were gone, they brought in big dredging machines that dug out the rivers to the bedrock and left huge banks of rock and sand all over.  This type of mining continued until just before World War II.  It used all the trees in a 30 mile radius for running these dredges.  Pretty well devastated the area.  I was glad that it has grown back now, because it was a beautiful area for us to visit and have fun.

Thursday, August 4, 2011

Weaving for the Film World

As I said in the last post, I took another commission to weave for an upcoming film taking place during the New Testament period.  The weaving sounded interesting and I am always in need of money.  You saw the first warp on the last post, but now I'll show you some more.
 The second warp is a lighter weight.  It is LB 1878 sett at 12 epi.  I had never used this yarn before, but I was pleased with it and will probably use it more.  This piece could be used for a period robe for the show and it would flow very nicely.  I wish the yarn came in more colors.
 I had wanted to use the stripe sequence in an old shirt that I like, but it turned out to be too complicated, so I simplified it to make this fabric.  I thing it worked out well.  Thanks Fibonacci! 


The last fabric is my homage to Dorothea Hulse.  She wove the original for the movie Ten Commandments, I checked out pictures on the "net" and came up with this sequence.
I think the red is too intense, but I had to use what was at my LYS at the time.  We found a rust to use as the weft, I hope it tones it down some.  I want the stripes to stay as pure as possible, so the ground (red) is in plain weave at 8 epi and the stripes are broken twill at 12 epi.  Hope it works.


The weaving on the third piece is taking a little longer than the first two.  I've been traveling.  Last weekend I spent 2 1/2 wonderful days at a spinners retreat.  (I did have to leave Saturday because I could not get out of working at the regular job...but it pays the bills so I have to comply.)
This is a yearly event that I used to attend regularly.  My DD has been on my case for the past couple of years that we need to go again, so this year we made it.  (She had attended several times before...of course she is also a spinner.)  It was so fantastic and so relaxing.  I realized how much I had missed the event and these people.  There were many spinners that I had know from before and new spinners for us to meet.


The weekend before, I had spent at IWC.  It was a great conference and for the first time in a long time, I experienced weave structures that I had not know before.  I took Robyn Spady's workshop of unusual and different weaves.  I had read about most of them, had previously woven a few of them and enjoyed weaving all of them in the class...especially the velvet.  I now have plans for weaving a couple of  pieces using several of them...I don't even have to buy yarn because I have projects that were just waiting for the perfect structure!


But I won't be weaving those too soon.  I am going again this weekend and I am tied up with the last part of the film work...Warp Weighted Looms. 
I have read about these and tried one at a museum, but I had never set one up.  It is easy to come up with the generalities of the equipment, but the details are giving me trouble.  The film company made the looms from pictures, so there are a few things I think we will have to alter to get them to weave.  That is usually the case when we are flying blind.
I wove a band for the first loom, leaving 3 yard strands off one side for the warp.
The band is on my inkle loom on the left and the wefts (that will be warps) are measured on a small warping board on the right.  
I am mostly using yarns in a natural sheep colors, with some accents in the stripes with dyed color.  I figure during that period of time, undyed yarn was common and dye stuffs were expensive so they used less of them.  
I tied the band to the warp beam and you can see the warp hanging down.  
I hung the warp on the loom in my garage and am trying to figure how to tie the heddles so that we can weave on it.  I have scoured the "net" and asked several places, but am not sure exactly how I will do them.  I use individual doubled heddles on my Inkle loom, and I have tied continuous heddles when I have done back-strap weaving, but what will work best and hold up with others weaving during the filming.  The weavers in the net use "knitted heddles" but they seem to slip and I need something anyone can weave on without previous experience.
Also the heddle rod supports (the U shaped piece sticking out.) seem to be too small to get a shed.  I think they will have to be replaced.  I think that the rod needs to be at least six inches from the upright.  The heddle rod is resting against the upright now (I guess that is referred to as the natural shed.)
The film company had some pottery donuts made for my weights, here you can see them in action.
Here is another picture in the garage.  I will try to pull the thing outside so I can step back and get a picture of the whole thing.  I am sitting and staring at it trying to decide how to do the heddles.  That is today's challenge.  I will be leaving tomorrow, so I really want to get the heddles done today.
I have also started the band for the second loom.  I decided for blue as my color, maybe not so good for the period, but I think it will look good and I like it.
Here you can see the warp as I weave the band.  I try to bundle groups of twenty warp ends so I can keep them somewhat under some control.


This whole thing is growing in time and space.  I really want to get it done next week, but I think that the fourth loom (still at the shop where they dropped it off) is going to be a challenge.  It is a ground loom and I'm not sure what I want to do with it.  I think I will have to use cotton for that warp due to the stress on the warp...it is more like a back strap warp.  And with different people working on it, I need to make it "fool proof" also.  I want the looms to look good in the background of the film and to have the actors look right when they work on them.